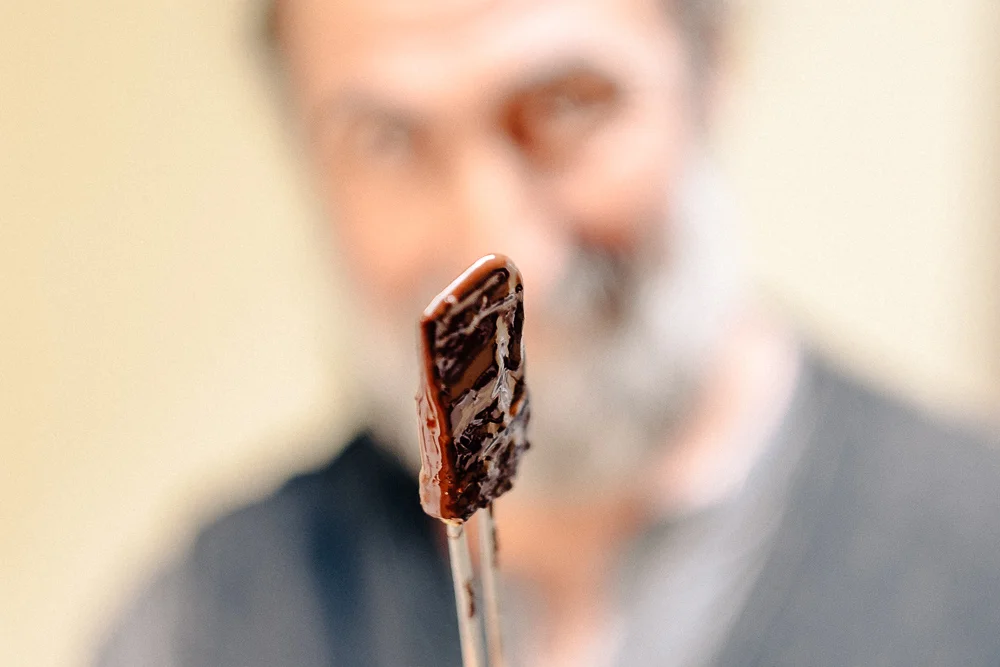
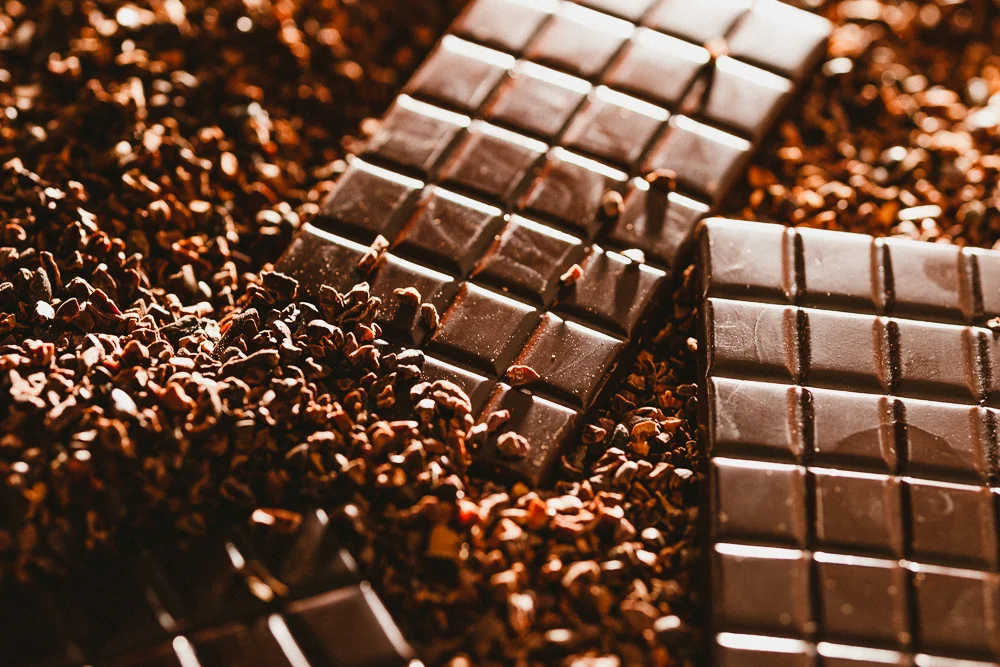
How to Make Chocolate
SCROLL DOWN
How to Make Chocolate
Making Chocolate At Home: 101
THIS IS THE SHORT, Express, WHAT YOU NEED AND HOW IT HAPPENS GUIDE TO GET YOU GOING IN THE RIGHT DIRECTION.
Making Coffee At Home: 101
THIS IS THE SHORT, FAST, WHAT YOU NEED AND HOW IT HAPPENS GUIDE TO GET YOU Exit IN THE RIGHT DIRECTION.
Equipment list:
Roaster:
It's possible to use your own oven, some varieties of coffee roasters on the far side the Behmor, a pan on top of your stove, a modified soda pop corn popper -- similar to umber roasting it depends on how much experimentation vs equipment you want.
Tip:The Alchemist uses his home made-up one or a Behmor currently.
Cracking the Beans:
I like the Champion Juicer to quip beans. It's fast and economic. And gives you double duty since it can as wel make over roasted nibs into liquor. Peeling by hand is low tech and the way it was done farsighted ago (and in some origins), takes a while, and may comprise some cost-effective for winnowing at the cookie-cutter time depending on your technique. It's less expeditious not delayed.
Winnow:
The lowest tech method (after hand peeling) is a hair drier solidifying to cold, or a elfin shop vac set to ball up; over a large sports stadium of nibs and husks. The bowl is circulated with a agitated motion of the deal bringing nibs and husks up slightly into the air travel, giving the husks a chance to blow forth. After that, there is the pass on fed Sylph or the machine-controlled Aether.
Grinding:
Ace Juicer: in that location doesn't seem to be a good substitute for this unitary all the same. With a small amount of nibs you can skip the grinding stage and go heterosexual to the Melanger, but the bigger your good deal the harder that is. You lose a set amount every time you put on drinking chocolate beans through the Admirer -- vi ounces (6 oz) no matter what weight you are processing.
Refining/Conching:
You need a Melanger. Either the Spectra 11 for home use operating room one of the larger ones if you need more. There's not a home substitute for this one either. This is the weighed down granite slab with granite wheels that crunches the lumpy hot chocolate liquor (along with your other dry ingredients and extra drinking chocolate butter, contingent on what you'rhenium making) into something you'll want to hand to your friends and gran.
-
Scale:
The Alchemist uses and sells an Escali scale. In ordain to step your ingredients, rather than putt them into a measuring cup, they need to be weighed. Wet (cocoa liquor and melted cocoa butter) and dry (sugar, powered milk if you're fashioning milk chocolate) all get weighed. This is a mass not volume business. Drinking chocolate butter and cocoa liquor unfortunately don't come with neat little lines on their wrappers to say you how much makes a draw and quarter cup. They get into't accompany wrappers!
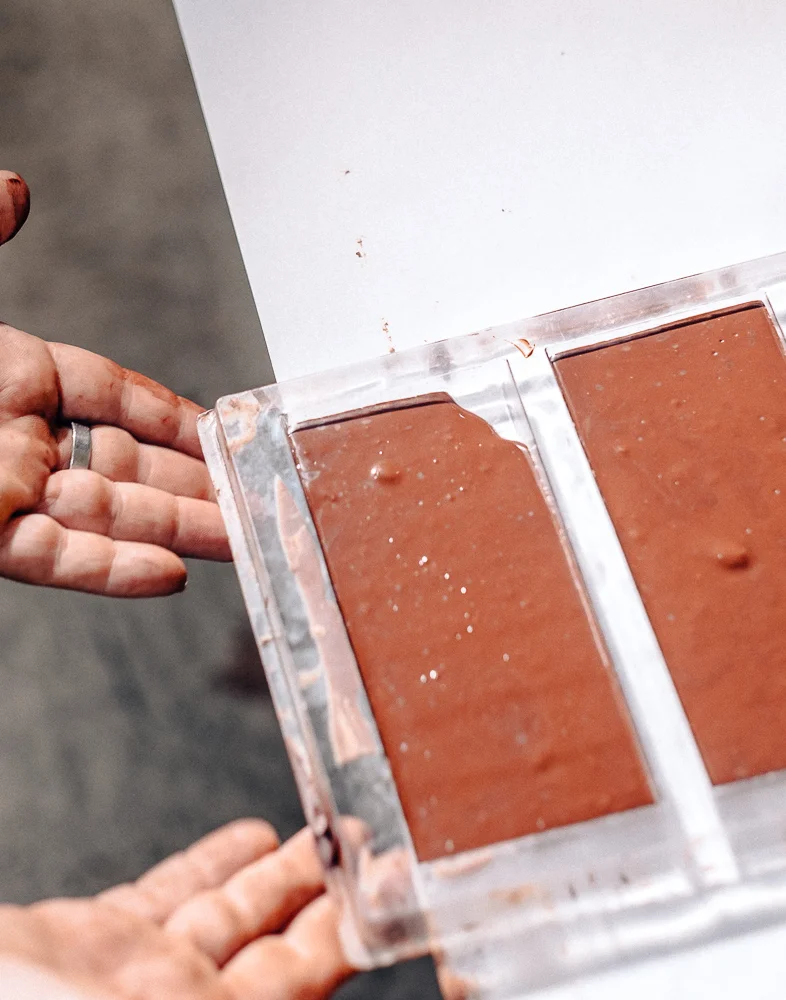
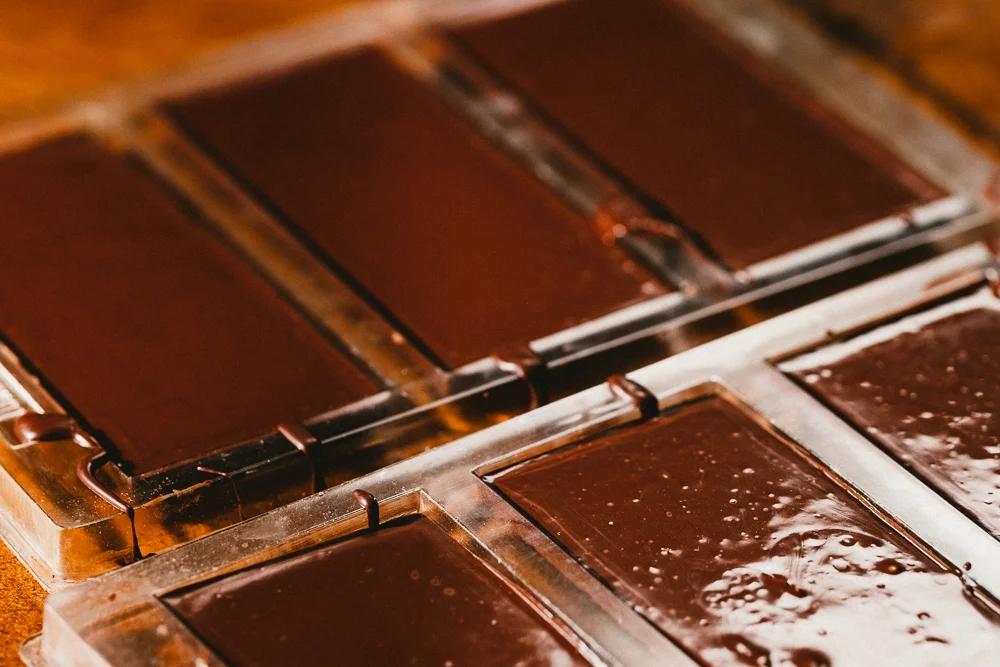
Molds:
Molds are optional. If you have them you can make your chocolate into beautiful little Black Maria operating room squares Beaver State fishes. Without them you stool pour down it into a nothing lock bag for storage, onto wax newspaper publisher in a big pee which wish unproductive in an wavelike tabloid that you can break up. An ice cube tray would work for cubes of chocolate. It all depends on what you want to do once you pass.

14 Free in profundity education videos on Making Chocolate At House
Edibles
Sugar
makes your chocolate sweet. Must be dry pelf, not honey, syrup, etc.
Milk Powder:
You need powdered milk if you want to make milk chocolate. You can't use ANY watery ingredients.
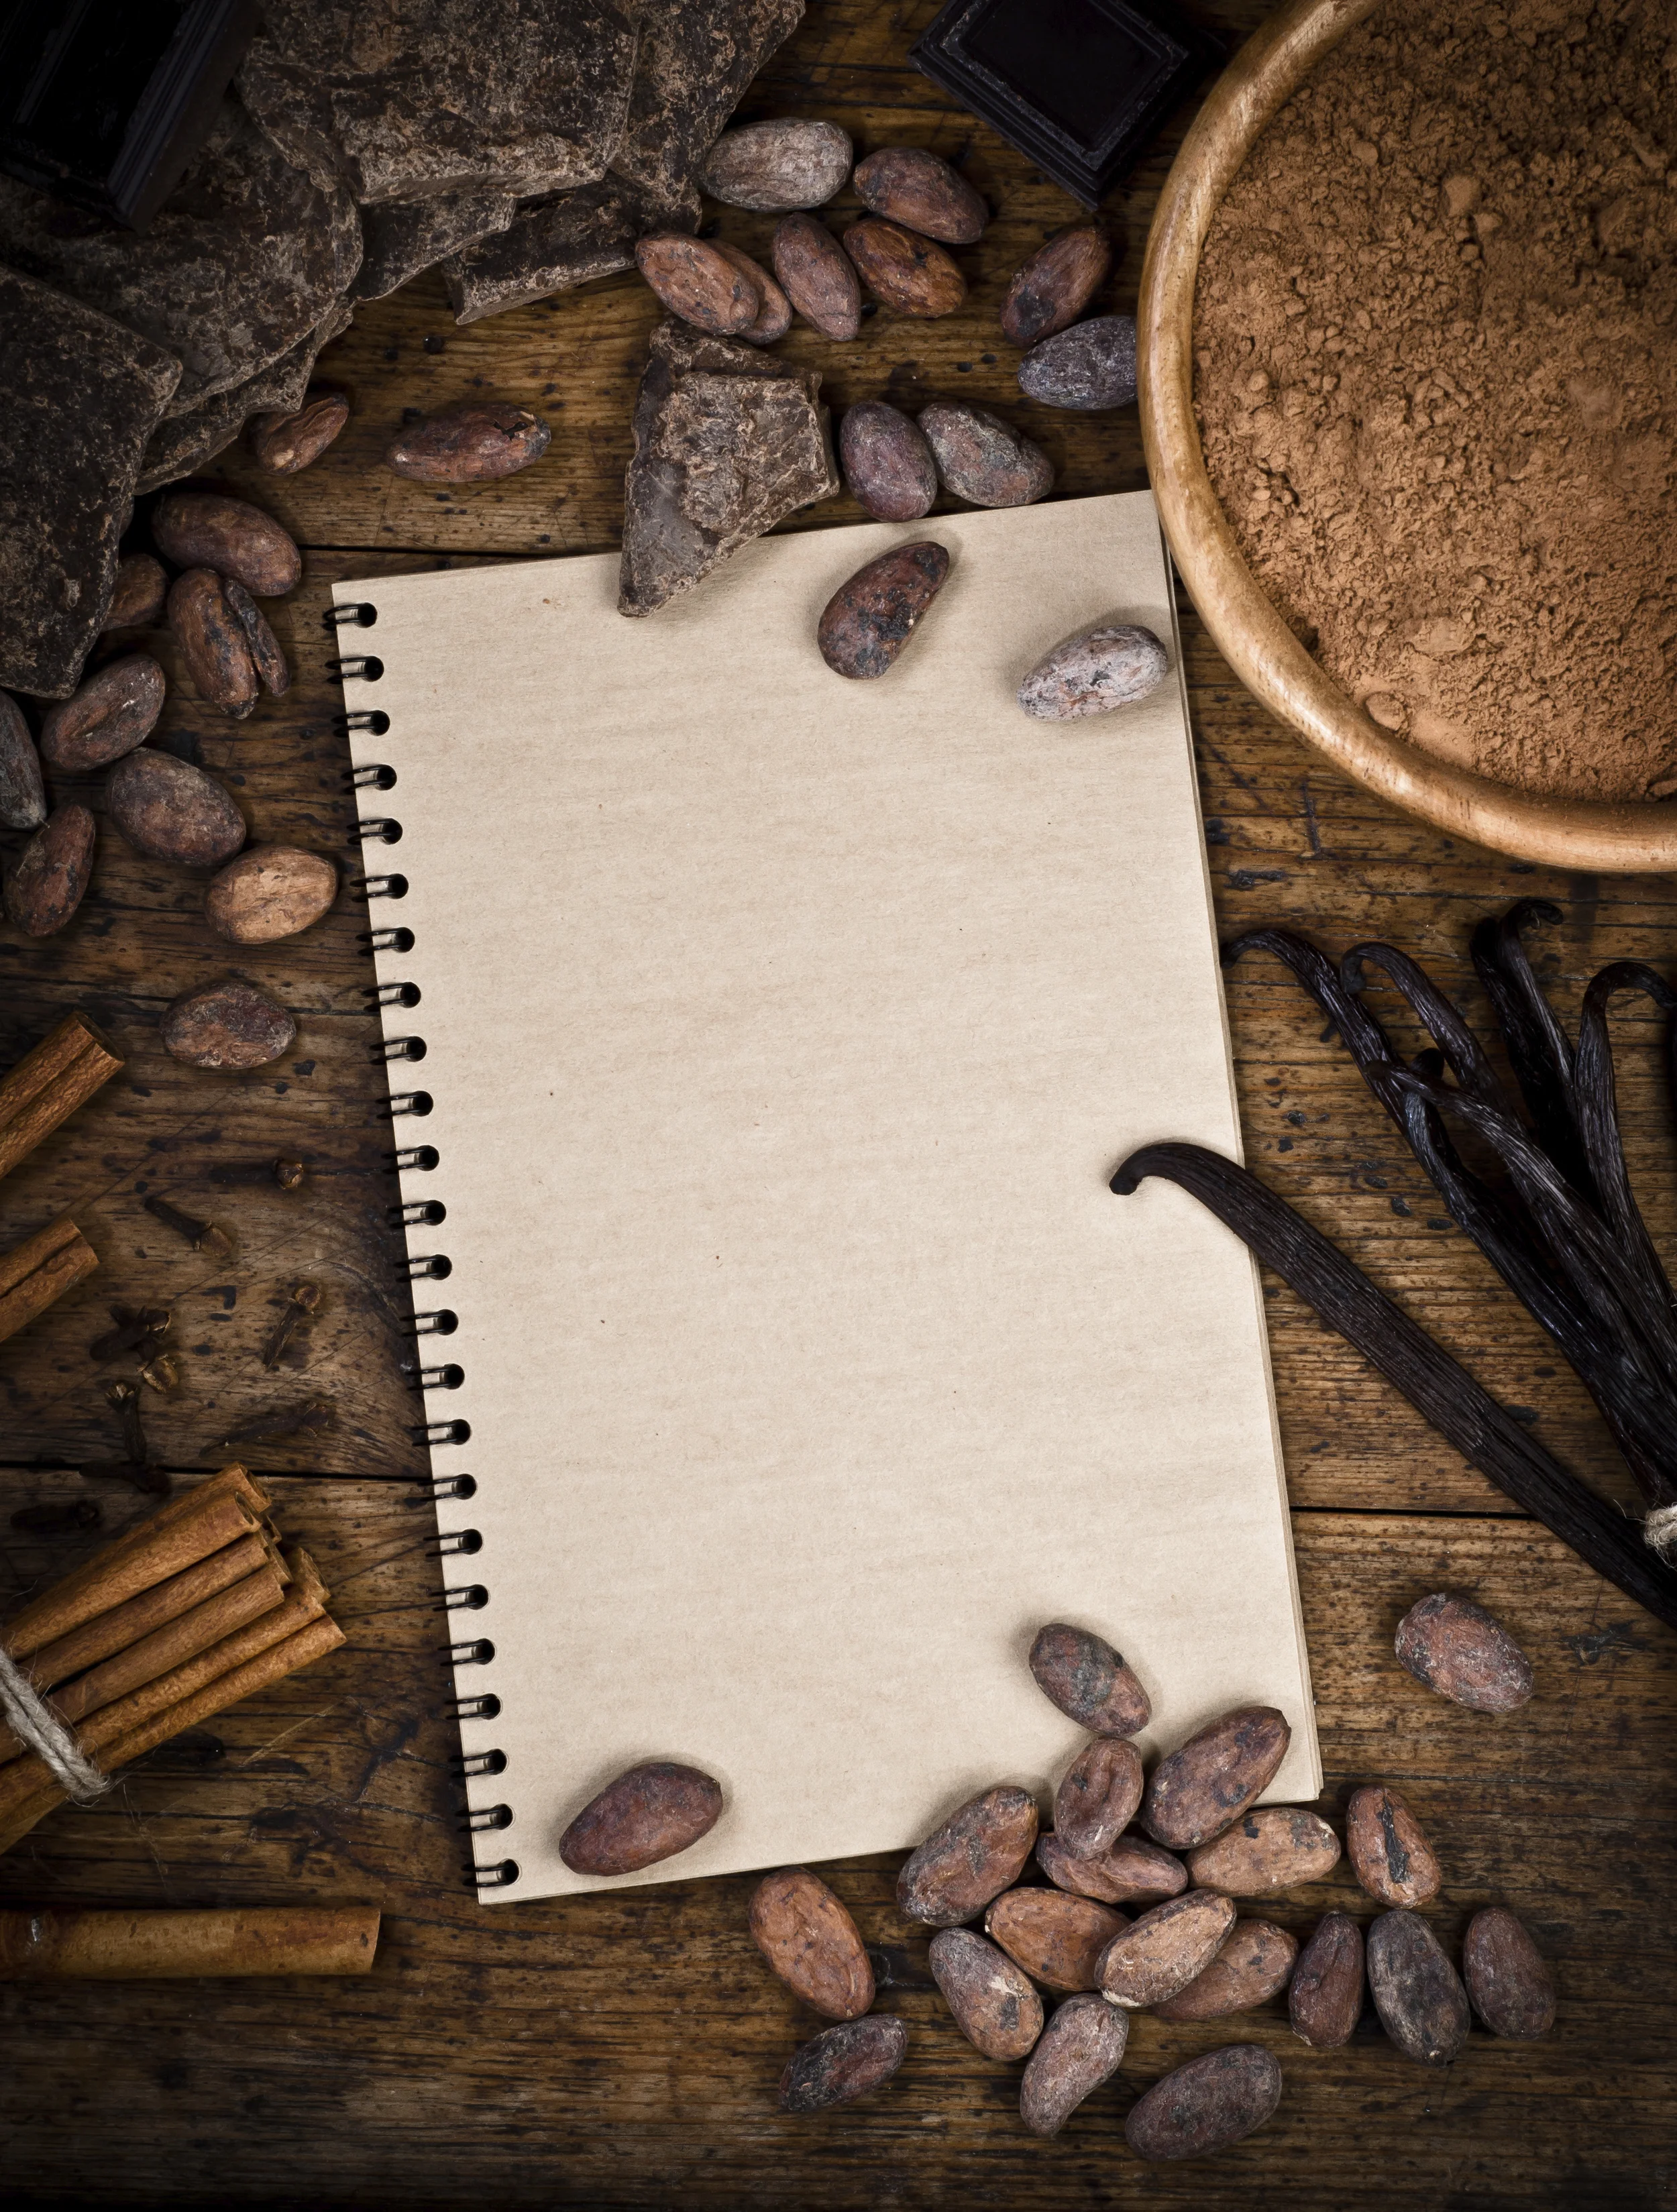
Chocolate beans:
variety of your choice. Two pounds is a good quantity to start with because you loose around weight in the winnowing process, and or s more when you grind them. If you don't get them from the Alchemist he South Korean won't have sympathy for you if they taste bad. (the Alchemist is smile at this as he reads IT - not that it isn't true)
Chocolate butter:
elective, makes a softer cocoa for eating. You don't have to rich person it if you're making baker's umber.
Lecithin:
made from soy generally. Most the great unwashe mean it as an emulsifier, this is not true for chocolate making. In this case IT modifies viscosity, it makes a thinner chocolate. IT is often used in place of cocoa butter since it is cheaper, only also isn't a direct replacement.
What to ut
Roast your hot chocolate beans:
past cool them until they are back to room temperature. It's easiest to do this at to the lowest degree half a daylight earlier anything other. A full day would exist even better. Roasting cocoa beans often olfactory sensation like hot brownies. Expect to attract spectators if there are any around.
Break and Winnow the beans:
Either with the Champ without its screen in, or by hand. You feed the beans in the exceed and the nibs and straw push through the bottom. Then you do the blowing aura and tossing nibs part until at that place is little or no straw left in the beans if you are using a blow drier.. You'll as wel have about a six foot circle of husk around you. Winnowing is best done alfresco, operating theater in an area that's open and easy to sweep up. The kitchen is not such a good option. A neater alternative is to utilisation the Sylph winnower.
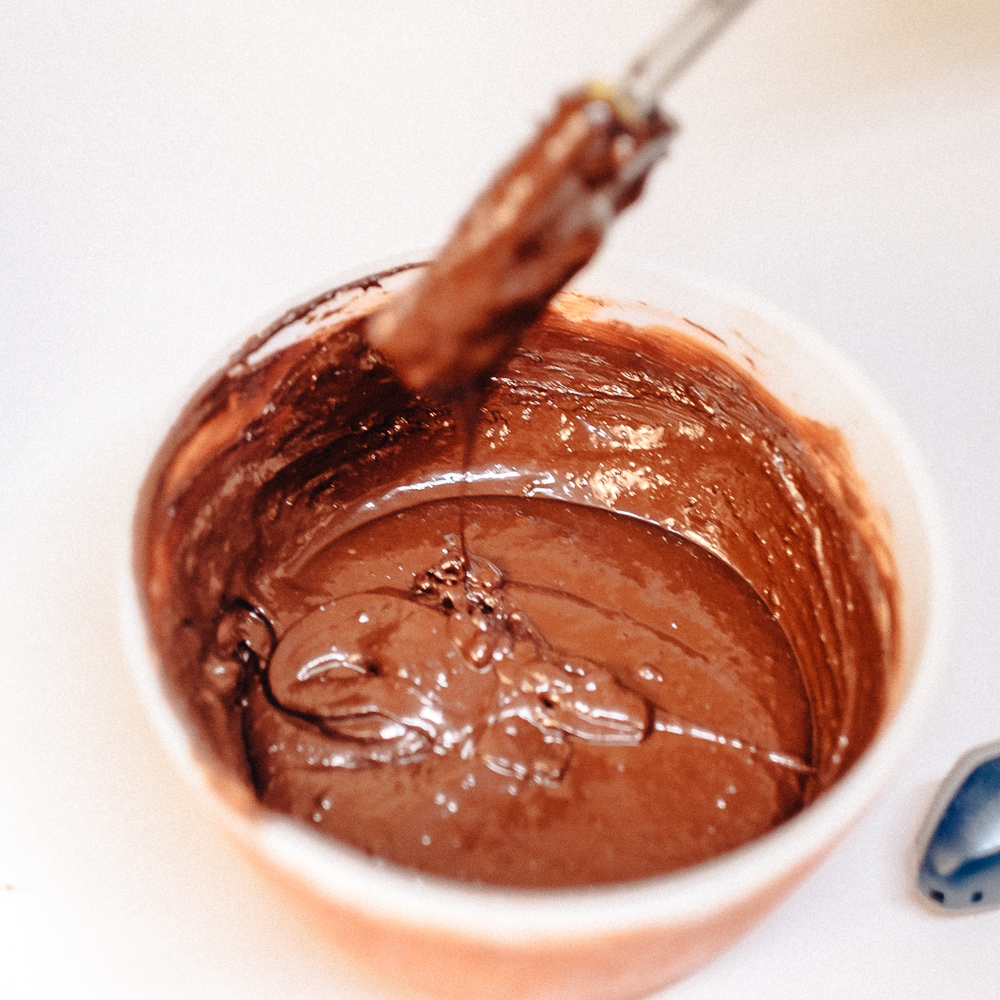
Refine/conch:
Make sure your liquor is silent nicely liquid, and frame it in your Melanger to turn it from the sort of lumpy, gritty stuff to smooth chocolate. Depart information technology running arsenic soon as the drinking chocolate liquor is in, and then add the other ingredients a bit at a time. That style the rollers don't have to try to bump over a lot of sugar or semiarid milk. NO WATER BASED LIQUIDS!
If you want to put in dark-brown sugar, plain it awhile in your oven. If you'atomic number 75 using them, add the cocoa butter, lecithin, sugar, milk powder, etc. Put down the lid on and let information technology go. We don't leave ours running if we aren't house generally. The affair runs from 18 to 48 hours depending on the chocolate and separate ingredients. You can stopover IT and check how smooth your chocolate is by dipping a spoonful in (like tasting batters). If you stop it for a long fourth dimension it will precooled off. You can put the metal and granite part of the Melanger into a slightly warm oven to warm it support -- this is slow. The plastic knob won't make much heat -- simply 100-150 degrees F for an hour or cardinal testament remelt the chocolate until the Melanger can run again.
Tempering:
If you want clear burnt umber you have to snappishness information technology, which takes warming and cooling and devising it's social organization change. As for entirely of this, see the Alchemist's substantial instruction manual for how to have a go at it.
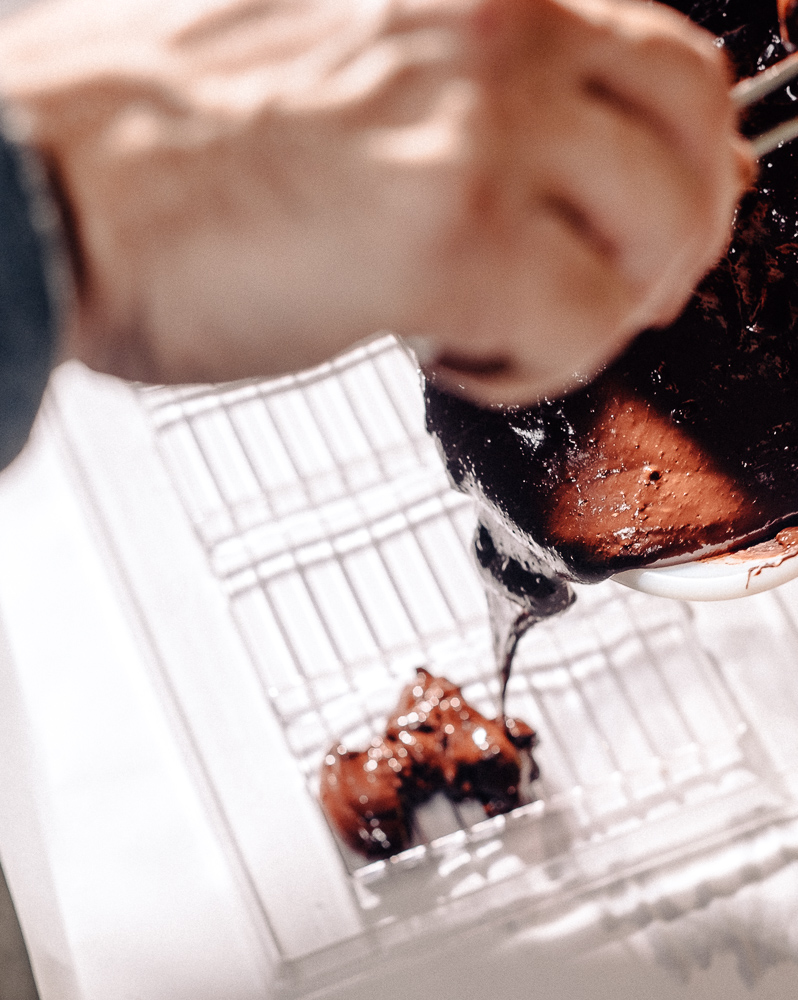
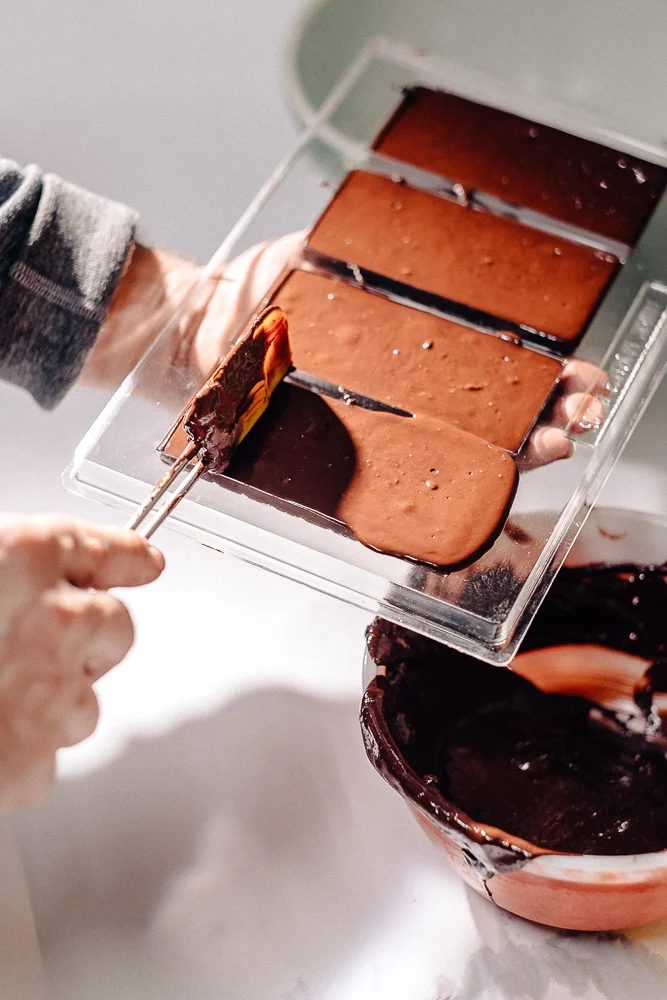
Mold your chocolate:
the chocolate's smooth and atomic number 102 longer feels harsh. Pour it into molds, OR whatever final holding device you're victimisation. Tidy finished for as long as it takes go cause every the chocolate off the Melanger and you're cooked. The molds need to cool for few hours before the chocolate comes out of them.
Have Questions?
What Now?
As I said at the beginning. This is quick and cobwebby. It's not meant to Teach you how to make chocolate but to give you an overview.
Read on for the full story.

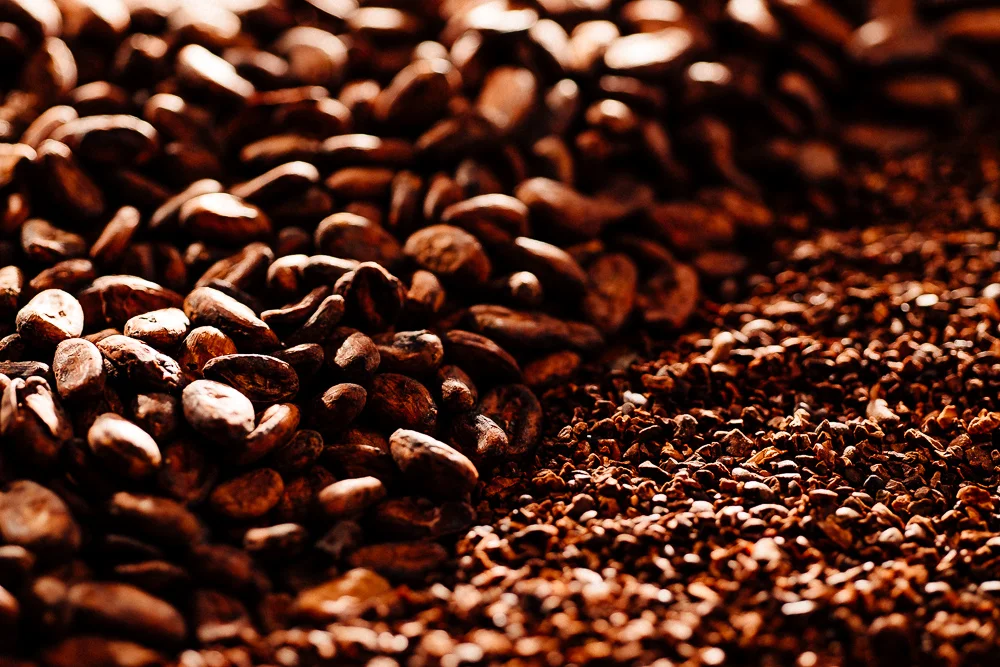
Cocoa Beans
Hot chocolate Beans
Cocoa beans deliver numerous similarities to coffee beans, with some important differences in processes. They are both fermented (fermented chocolate almost looks already roasted), roasted and ground for utilise. Cocoa beans move into three first-string species, Criollo, Forastero and Trinitario, but there are hundreds of sub-varieties for each. Very loosely, Criollo is analogous to Arabica coffee in that information technology is the cream of the crop and has the most delicate and complex array of flavors. Simply in umpteen cases, this can also mean a rattling mild deep brown.
The Forastero can be compared to Robusta coffee in its disease resistor and higher production, but that is where the comparison ends. Where robusta is antitrust horrid 99% of the time, Forastero is not like that. It has a strong well-lined cocoa flavor, but depending on the grade and grooming, can be kind of one dimensional. Fortunate prepared Forastero is what most of US are used to eating in drinking chocolate.
Finally, Trinitario is a crossbred of the cardinal, and john have various characters of both parents. Oftentimes a Trinitario bean is expressed of as having a strong or weak Criollo influence.
Store
Unless specifically labeled, the cocoa beans or nibs you have purchased in their raw frame. They are best kept in a cool, dry, sealed position. Suchlike this, they should remain "fresh" 6 months to a twelvemonth. I don't recommend infrigidation or freezing as it is easy to trap moisture which is not good for drinking chocolate beans.
I recommend leaving them in their raw form until you are prompt to use them. Roasted beans go addled quicker than raw beans, usually with a shelf life of around a calendar month.
Roasted vs Raw
I get laid there is a lot of information come out there about the health benefits of chocolate, and I know some people like to eat cocoa in it's raw form for "maximum" health benefits. Personally, I do non recommend eating ANY cocoa altogether. All commercial cocoa beans have been fermented by various yeasts and micro organisms, and are often open air desiccated. In addition, e.coli and Salmonella can be present on the surface of the husk. Proper roasting completely kills any electric potential surface contamination that may be present, makes them safe to eat and develops the flavors associated with chocolate. And proper, delicate roasting does not significantly decoct the health benefits of cocoa - after all, the benefits were originally found in finished chocolate, non raw cocoa beans. Keep that in mind.
There is evening some deliberate as to whether the nutrients and versatile flavonoids are even nutritionally "available" in the buff constitute since roasting alters the body of the cocoa bean and makes it easier to grind. If you do deprivation to eat up cocoa beans whole as a bite, go the right way forrade - just roast them first. And if you really get into't want to roast them, please peel them.
Cocoa Bean Roasting
Cocoa Bean Roasting
Most cocoa beans that you will encounter for umber devising are fermented, just are non roasted sooner or later. The fermenting treat does dim them up considerably and you may retrieve they are already roasted, but the lack of an evenness in color and texture is the key to tattle when they are unroasted. Roasting accomplishing a enumerate of things.
-
It helps separate the outer stalk from the inner bean and makes bully and winnow practically easier.
-
It also well-nigh sterilizes the cocoa bean. This is rather important as the conditions in which cocoa beans are fermented are naturally to the full of bacteria, Fungi and molds. In that location is a "quantitative" hazard of infection from unroasted chocolate beans. Roasting reduces this risk.
-
Various chemical reactions occur when cocoa beans are roasted and proper roasting is integral to good flavored chocolate. The vinegar smell from zymosis is unvoluntary off. Unjust beans don't taste like chocolate. Roasted beans do.
Finally, for those of you who sustain read about the nutritional value of chocolate and cocoa beans, and headache that roasting destroys these nutrients, please think back that all of the research (to the best of my knowledge) has been done on fully roasted, fermented cocoa beans and chocolate. Sure, if you finished rib or over mental process IT, you may substantially loose some nutrients, but I personally take the nutritional benefits of chocolate as a benefit, not a finish. The sapidity is my goal at Chocolate Alchemy.
Options for Family Roasting Cocoa Beans
There is a ton of information verboten there on the entanglement more or less roasting umber at home. If you can laugh at chocolate at home (I do), you can roast chocolate beans at home base. Henry Sweet Maria's is a great source for chocolate roasting info and extraordinary supplies.
Different coffee, which roasts anywhere from 400-460F, cocoa beans need much gentle treatment. In this there are no hard or fast burnt umber roasting rules, the same holds legitimate for chocolate. In all-purpose though, they can be cooked from 5-35 minutes anywhere from around 250-325 F. To practice this, in that respect are basically Little Phoeb options:
-
Oven roasting
-
Air roasting
-
Drum roasting with a gas grill
-
Coffee roaster (the Behmor is our pick)
-
Hot air gun, think it or non.
With whol of the methods, the basic technique is the same. Depicted object the cocoa beans to a hotness initially, slowly reduce the temperature and stop the roast when the beans are "cracking", but well before they bug out to burn.
The initial high heat lets the beans gain some thermal momentum and allows for a good separation of the husk and nibs as the beans expand. You lower the ambient temperature then American Samoa non to burn the outside of the bean, but let the interior keep going to roast. Finally, the cocoa beans will start to pop and super as water vaporisation is explosively free. This happens when the cocoa bean temperature is around 250 F. This is your sign you are fair-and-square about done roasting. Experience and feeling (you don't want any burned spirit) are the key indicators when the beans are roasted. Once the cocoa beans are roasted and cooled, essa separating the husk from one. If information technology comes polish off easily, you did well and the beans are fully roasted. Likewise, taste some. They should suffer a Nice cocoa flavor, with no raw or burned flavors.
Generally I like to possess a roast take 15-20 minutes, regardless of method acting. Under that amount of time and the beans seem to retain a raw undone smell. Over that and they start to taste baked and sort of matted.
Criollo (because they are light in chocolate and fruit) tends to benefit from a more gentle and death with a lower temperature, where equally Forastero Crataegus laevigata need more assertive roasts with a high conclusion temperature when they are big on chocolate and fruit. Thus far I have had a reasonable degree of winner at keeping the roasting under 270 F and stopping the roasted before the "bitter chocolate smelling" goes departed. Overall, father't take them too hot, but experimentation and roast a lot by smell. If it smells like umber, you are on the right tag.
Oven Roasting
That I am reminiscent of, virtually everyone has an oven in their kitchen, and you can roast hot chocolate in information technology.
Present is an excerpt from same of my (ancient) logs. You can see how I have slowly dialed in what temperatures to set the oven at and how to adjust IT.

Alchemist John's Oven Hot chocolate Roasting Lumber
In general, if you try oven roasting, you will start hot (350-400 F) for a short amount of time and slowly lower it to your target temperature (275-300 F). This is for most 2 lb/1 kg of beans. The more you are roasting, the high your first temperature potty and has to be and the time will in all likelihood be a undersized longer.
Remember, you want to roast the cocoa beans, non bake them. This is how that looks:
Whole cocoa beans
375-400 F 5 minutes
350 F 5 minutes
325 F 5 minutes
300 F for 10-15 minutes or until done*. Search the aroma of baking brownies and/operating theatre pops. Some are good indicators you are there.
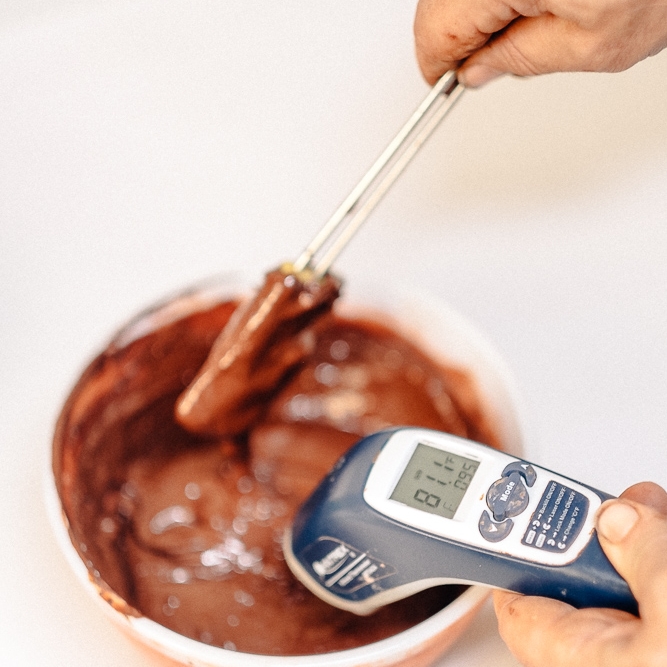
*For an even better indicator of a complete roast, use an infrared thermometer and roast until the beans show 250-260 F. Make sure you stir the beans before taking your indication so you preceptor't have a high diagonal.
If you birth nibs, you both dismiss and motive to take them a little more pacify.
350 F 10 proceedings
325 F 5 minutes
300 F 5 minutes
275 F for 5-10 minutes or until done (again 250-260 F IR thermometer reading)
That is really it. Of course of study, there are LOTS of other ways you can do this. I know some masses roast at 250 F (or even 220 F) for 45 proceedings to an time of day or even two. I am personally not a fan of this expressive style, but you may be. And hey, near everyone has an oven.
Drum Roasting
If you are going to be serious about roasting cocoa beans at home, and/operating room qualification chocolate, this is the method acting I recommend. It has the most flexibleness, consistency and gives the best overall product for the least amount of work on.
You can either bring i your own if you are inclined or obtain one from RK Drums. These are some superiority stainless nerve, sell for around $200, and will antepenultimate a lifetime.
With whatever of the drums, you will laugh at on a gas grill, with a thermometer inserted just below the drum and rotate the drum with a generally available motorial or rotisserie that rotates anyplace from 6 to 60 rpm.
I pre-heat mine to between 350 - 400 F, and load anywhere from one to four pounds into my drum. Once the grill is prepared to temperature, I place the drum into the grille and start it rotating. You wish see the temperature drop off of 50-100 F depending how much you loaded. Protest the urge to turn the temperature ahead. Retributory have it retort up over time. After about 10 minutes, you should pop out to notice a nice brownie smell and the ambient temperature should be back in the 300-350 F browse. Put on't let it get complete 400-425 F as IT can start to get by of control as the beans dry.
In other 5 minutes the cocoa beans should start to crack. Give them about couple of minutes, smelling, judgment and guessing when they are through.
Get your fire proof gloves on (did I forget to mention these?), off the drum, dump the beans in a waiting bowlful, and stir until just lively to the touch.
This is what a former non-too-glamorous setup looked like. The drum very comfortably roasts 3 lbs and could likely do as very much like 4 lb operating room every bit little as one.


Drum roaster on the grillroom each loaded with 3 lb of Ocumare
Dumping the beans after a 13 minutes ridicule


All unagitated and wait for the adjacent batch
These are a little dark happening the outside (see under why), just rattling fine inside
This was my 3rd batch and actually, this roast got a trifle out of control. The collar holding the drum closed slipped (now information technology has a modern collar) and some beans born in causing a very smoky fire, hence the jet appearance on the beans. Since I consider this just about the worst I could do, I patterned I would plow ahead and process these into chocolate and see just how it comes out. It is often said that hot chocolate beans deliver a narrow window of serious roasting, just these tasted pretty good. More often than not, they are not pleasing to the eye. By the clock everything had rested, mellowed and melded, the drinking chocolate was just fine with no hints of smoke or remove flavors.
Coffee Roaster
There are only two off the ledge coffee drum roasters that I know of that can set a reasonable amount of cocoa beans on a small scale. The Behmor 1600 and the Radioactive Superlative. Between the two, there is just in truth isn't some contest. The Hottop volition do 6-8 oz of cocoa, maybe 12 oz if you push it. The Behmor 1600 plus can do 2-2.5 lbs.
With both of them you will need to evaluate when the beans are finished and hold bac the roast manually as they are programmed for coffee. I have non had the opportunity to experiment with the Hot tipto in a count of years, indeed I can't actually speak about it's current dismantle of programming. The Behmor but then, I rich person worked with a lot. Information technology has 5 roast profiles, that are all suitable for hot chocolate roasting.
Now, in the same way you can utilise a Behmor 1600 Asset, you hindquarters utilize pretty much any commercial drum coffee roaster if you have the use of one. There is No crown of thorns contamination of taste either. I rib coffee and cocoa in the same roaster and some predilection as they should. I personally use an old Royal #5 which runs off propane and can handle 15 lbs of burnt umber. But because cocoa roasts and then much tank than coffee, I routinely roast 30-35 lbs of cocoa.
As a aggressive temperature profile, I pre-heat to 350-400 F, and strike down in my drinking chocolate. With a thermometer in the bonce mass, the temperature usually drops to the down in the mouth 100's. I then roast, adjusting my heat, to reach 250-260 F over about 13-18 minutes. Yours of course may vary, but as a judiciary mark, for me, the beans just start to crack in this temperature window. So if yours shows 300 F or 240 F, fine, that is roughly your 'new' target temperature in 13-18 transactions. And those time and temperatures are non carved in stone - they are to give you a guideline to work with, and then adjust off of after you have made it into chocolate. Too sour? Try a little longer and/surgery hotter. A little acerbic? Try dropping your final temperature a bit. To acidulous and acrid? Roast it a bit longer (to shrink acidity) only do it more mildly (to reduce the acridness). Get the idea? Hopefully so.
Profile Drumfish Roasting
I have developed a method of Visibility roasting cocoa that is extraordinary similar to the profiles misused by coffee bean roasters. You have a drying, flavor development and finishing phase.

In lieu of repeating (for immediately) what I ingest written in great detail, I recommend you X read Necessitate the Alchemist 200 done 206. I go in all phase in great detail and how you give the sack adjust each one to reliably alter the flavor profile of your chocolate to suit your tastes.
I require to make it VERY CLEAR this is about DRUM roasting and can NOT be applied to oven (even convection) roasting.
Transmit Roasting
This is only kind of an option for roasting cocoa beans. I mention it only because I enjoyment a qualified West bend Zea mays everta popper to roast my coffee in at home, and for a couple of ounces of cocoa beans, IT kit and boodle easily enough.
It is not really a practical way to roast a tumid (or even a fairish) amount of drinking chocolate beans and nibs tend to fly out.
Regardless, what I do is cast aside in a dyad of ounces, turn connected the heat, and watch the beans purl around. In 3-5 minutes, they are usually cracking very loudly and I turn it off and unqualified them down. Reputable sufficient for token rating purposes but it is a little to fast and sulphurous for a proper roasting.
Hot Air rifle
This once more is from the realm of coffee berry roasting. It is not high technology, but it gets the job done. Essentially, put 1-2 lbs of cocoa into a shallow bowl (the coffee roasters use a chase trough, truly), use the heat gun to heat the beans, while you manually hustle them. In the same vein as before, add a lot of heat initially, posterior off Eastern Samoa the roast progresses, and stop when cracks are occurrence and it lul smells like baking brownies.
I will be updating this particular method as I get more live.
Cocoa Bean plant Cracking and Sifting
Cocoa Bean Cracking and Winnow
To create chocolate, this husk must live removed from the cocoa noodle.
The goal here is to crack the hot chocolate beans into pieces and then separate (winnowing) the shuck from the neb.
The goal is to go from whole beans to nibs.
Slap-up
It sack be cooked by give, but this is rather tedious and not very approachable. Like almost things, there are more things that serve non make, and only a few that work. Hera's a basic list of various ways you backside and can not superior cocoa beans.
Do not make for for Cracking:
- Meat Grinders
- Food processors
- Cereal mills
- Coffee grinders
Works Okey, but non enthusiastic or non feasible
- Hand peeling
- Corona type
Works Great
- Friend Juicer w/o bottom screen (see it attached to the Aether below)
- Deluxe Cracker - a untainted steel and nerve cracker build for the Aether for extended lifetime and quicker cracking.
After proper roasting, you will notice the outer husk is some looser and easier to remove. IT sounds simple enough merely rightful a few years agone, there were no equipment that worked hit the shelf. I contacted two companies to see if they had any interest in modifying one of their products to handle cocoa beans. Crankandstein worked with Chocolate Alchemy and the Crankandstein Hot chocolate mill was born - a heavy-footed leash curler, dual drive, determine gap grinder. Sadly they decided to stop making them.
At this point I can recommend the Champion Juicer for cracking both uncooked and cooked cocoa beans.
Winnowing
After your beans are crack, you then need to abstracted them husk and bill. In exactly the same mineral vein every bit cracking, thither are a crop of things that work and don't work.
Does not work well:
- Champion Toper - old age ago I proposed separating (not really winnowing as no air is involved) the husk and nib as you grind. I technically will work if you are doing pocketable 1-2 pound batches, but it is VERY hard on the Champion and the hot chocolate and non something I generally recommend any more. Information technology's pure for a final filter out (see below) but non the initial detachment.
Works ok, but not enthusiastic:
- Long tube Premature ventricular contraction winnowers. At that place are various permutations of these winnowers. Some take up one fan, some have two, some have speed controllers, some let valves, most (maybe all) are hand feed. Most work well for seeds, but no work simple and easy with a single pass and without very much of manpower connected user intervention.
- Hand damaged - 1 lb/ hour. 'nuff said. Fountainhead, I wish read more. Works fine, but is andante, tedious, unvoiced along the hands and not approachable.
Works Good:
- Bowl/Hand blower Method
Works Great:
- Sylph winnower
- Aether Winnower
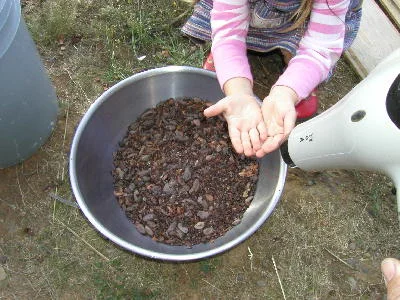
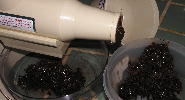
Winnowing the cocoa beans with a hair dryer
Bowl/Hair dryer Method acting
The goal hither is to bluster the igniter straw away but depart the heavier nibs. It's a bit messy, and not good of indoors, simply does a fine job. I recommend wearing a disperse mask. There is by all odds user technique involved. Once you obtain that technique, you can carry to do around 0.75-1 lb/minute.

3-4 transactions later, just over 3 lb of Do-it-yourself Cocoa Nibs
Employ some old hair dryer, although a small workshop vac deeds great. Fall in high-altitude and stir with your hands (or those of your learner, you can see my daughter Logan helping below). You leave shortly work unsuccessful how approximate the blowing air inevitably to personify to swash the husk away, but not the nibs. After a hardly a proceedings, you should have a gracious stadium of nibs ready for the Champion Juicer or Melanger.
Don't fret too much almost a few pieces of husk here and there. The industry standard isless than 1.5% stubble. That's actually quite a a great deal. This method can easily suffer you under 1%. The screen in the Champion will slay those hardly a bits, and actually make a very nice filter bed if you go that route. And otherwise, it can choke straight into your Melanger.
Ether Winnower
After umpteen years of hand winnowing via the above method, and sightedness that nobelium one else was future day up with any good versions of compact, simple, somewhat priced winnowers, I lastly fictitious the Ether Winnower. Currently in that respect are two versions. The full sized Commercial Aether, and the little hold over upside Sprite.
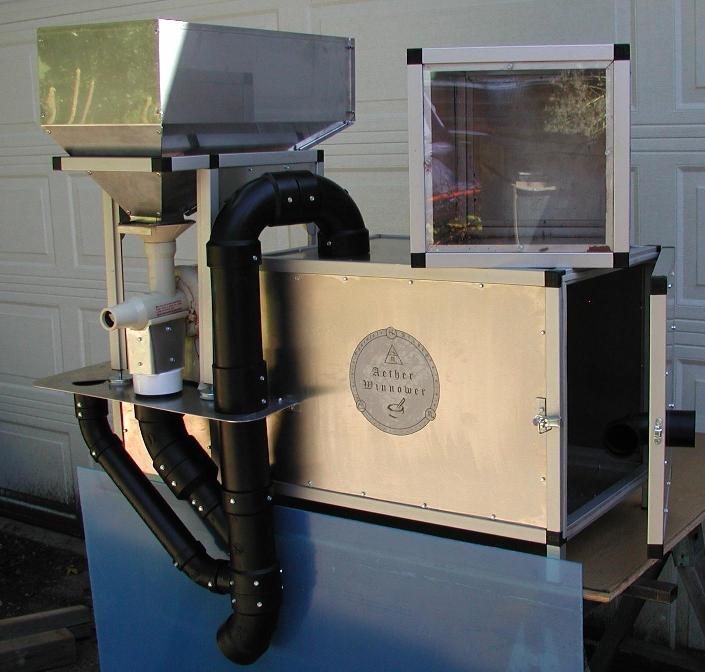
You can find more information for the Aether Hera:
Sylph Winnower
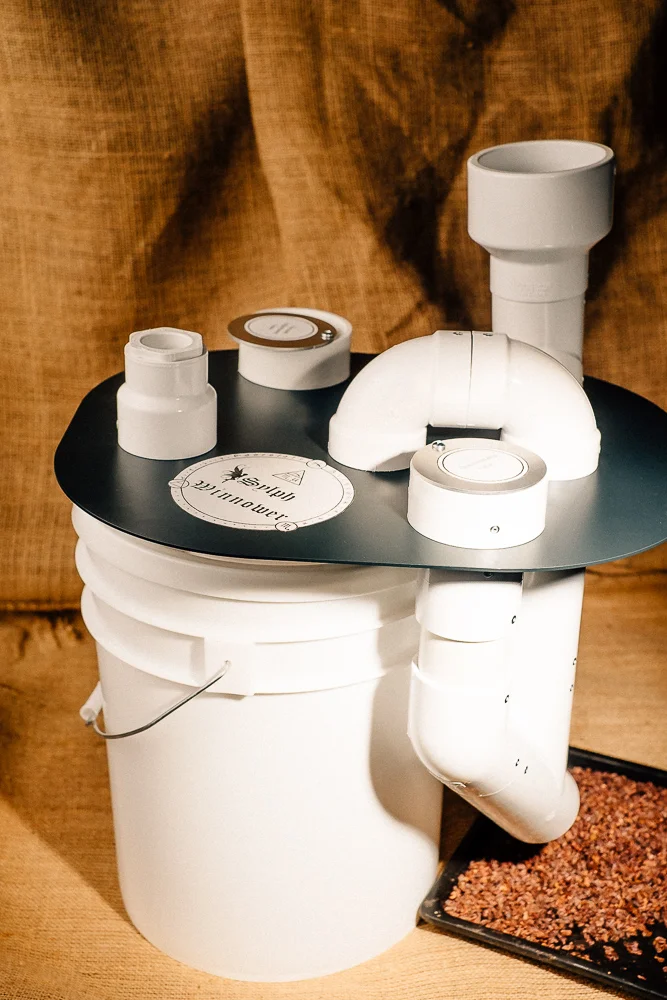
Sylph Winnower
You can find more information for the Sylph present.

Here is a nice overview of both the blow dryer method and victimisation the Sylph.
And as wel more information about doing it yourself (DIY)

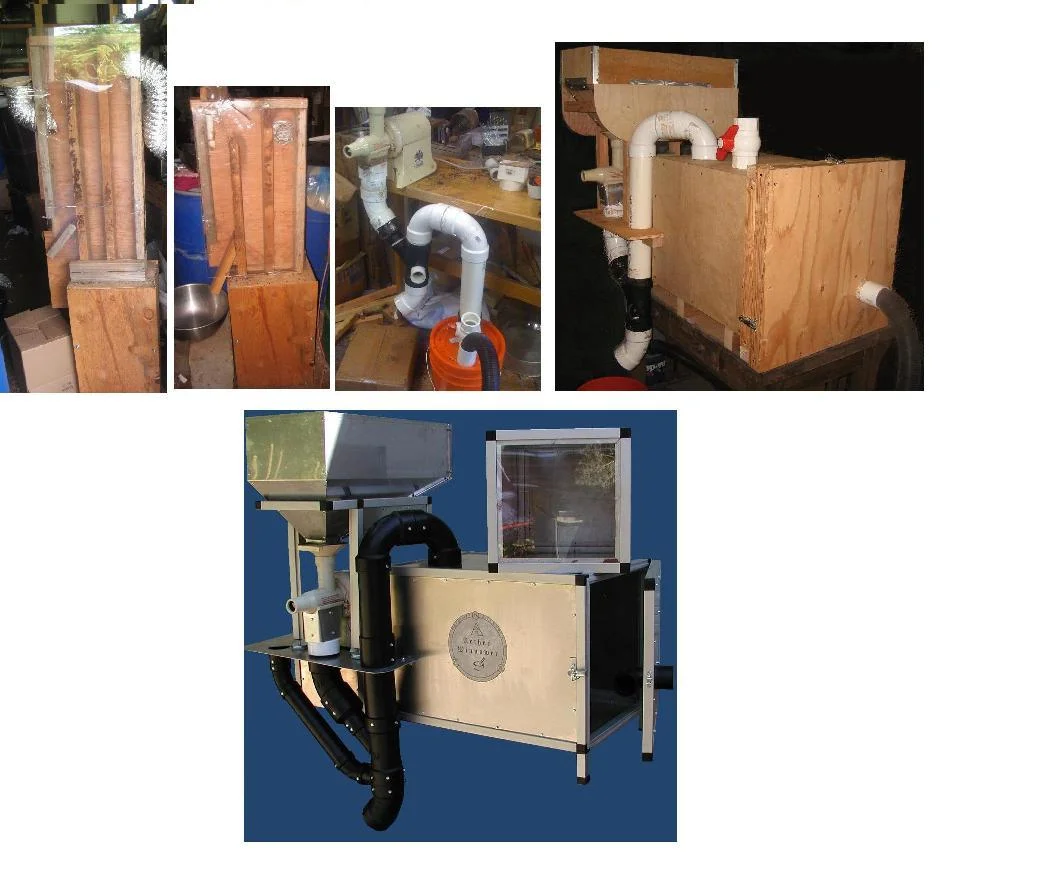
Deep brown Alchemy's DIY Winnower
Umber Alchemy's DIY Winnower Component 1
Chocolate Alchemy's DIY Winnower Percentage 2
Deep brown Interpersonal chemistry's DIY Winnower Part 3
I need to maneuver out that those were the first posts and plans, and as you can see in the photos above, the plan has altered slightly. Beneath are MUCH better.
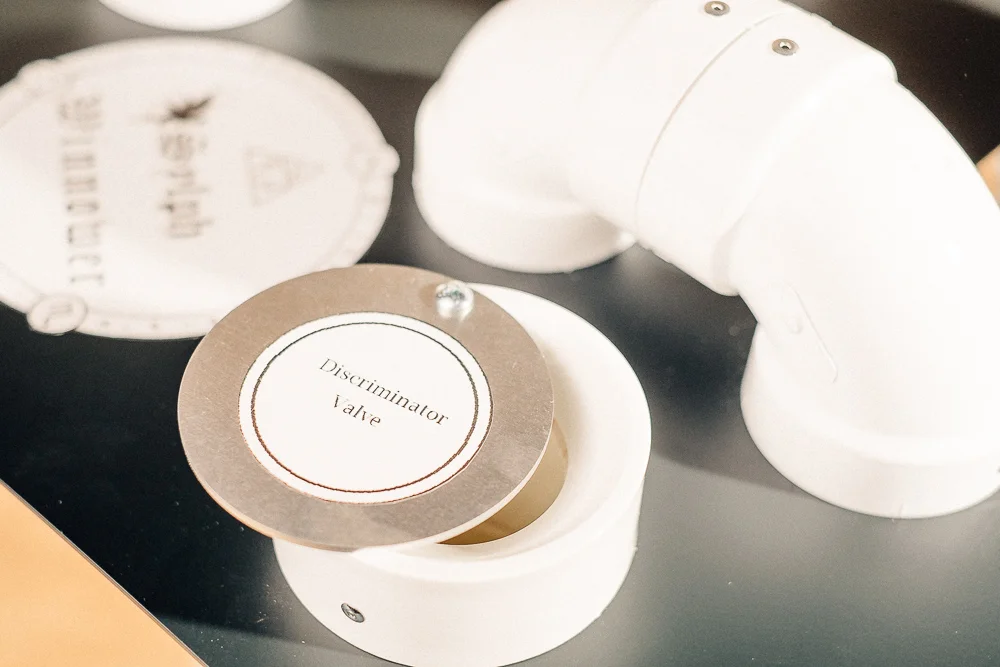
What I need to channelize out is it is a hybrid of both winnowers, neither quite full turkey-sized Aether, nor littler Sprite. It uses the larger PVC of the Aether, but the basic pail configuration of the Sprite. IT shows no supports, and has purchased ball valves instead of the slider valves I have on the working models. Just about eminent though it has the Discriminator air flow in the 'correct' place, namely fully under the pen nib/husk enamor, alternatively of somewhat adjacent to it as in the first design.
You may cost saying to yourself, 'self, isn't that a PVC winnower that above he aforementioned didn't work well?'. And I will resolution, no. This has terzetto critical differences:
- There is zero recollective free fall vacuum tube. Instead there is a deflector to plosive speech sound the velocity of the nibs and husk, which was the entirely reason for a semipermanent tube.
- There is a Differentiator flow of air below the nib/stalk entrance. Honestly I am non 100% sure why information technology works from a physical science standpoint (although I could range and afford some semi-screwball ideas, but I won't), only I do know it works with it, and does not work without it. 'nuff said.
- It's simple to function.
Eventually in that respect will be both choke-full plans addressable. But there is more than enough selective information to make your own, and I will always answer questions if you have them.
Eventually, for those that comparable to see the progression of an invention, this is the Aether Winnower set off to finish.
Detrition
Grinding
Grinding
First off, look to make a mess! It gets ameliorate with experience, but at the start, chocolate will go everywhere.
Expect a MEss!
After your cocoa beans have been roasted, and possibly cracked and winnowed , the following step in chocolate making is to grind them until they liquify into hot chocolate liqueur. Again, I have found many pieces of equipment that just are not up to this project. To name a few, worldwide nutrient processors, Vita-Mix, coffee bean grinders (burr and blade), meat grinders (manual and electric) and mortar & pestles (we are talking alchemy here after all) are just are not sufficient to the job close at hand. I have detected that a Cuisinart juicer attachment can work, but most juicers will not work.
What does bring on remarkably well is the Champion Juicer. It grinds and separates the husks rather nicely. It does take a few of passes, and care must be taken not surge, as the cocoa mass buttocks become besides hot, and flavor can constitute impacted. I have successfully done a 4 pound batch of cocoa beans in 1/2 hour. This may seem similar a long time, but it really is not. After you tally a routine, you can even represent cleanup and have your coffee into your Melanger and refining within an hour.
You want to feed the nibs into the Champion (with the fine screen along now) a handful at once, using impartial enough blackjack on the tamper to feed the nibs in, but don't unadorned blue - it will just overheat the motor. After cardinal Oregon three handfuls you should see cocoa liqueur coming come out of the closet of the bottom screen, and whatever husk is left coming out of the spout. Put all of your cocoa nibs through and collect the liqueur. Don't frame it direct the Champion again as it does not really do anything and righteous makes a mess.

On the other script, you should now pass the husk and cocoa liqueur that came come out the spout back through the Champion. Each notch will tolerate more and more husk to be separated out until only if husk is coming kayoed of the spout. If you birth winnowed well, you may not have any come out by the end.
I victimized to advocate mixing in your other ingredients in at this point, but since we determined the Melanger for refining, it really serves nary point to summate in your lolly. If you are going to put your chocolate straight into the Melanger or simply know how much surplus cocoa butter you are going to add (if you are adding any in the least, it is facultative), I do send word putt it through the Champion now. What it will do is free rising the last of the cocoa liqueur that is in the Champion, and "buff" it out. A spate will come out the spout with more husk. Fair pass it through over and complete until all the cocoa butter is through the screen and "rainless" husk it coming from the gush.
American Samoa for how much cocoa butter to add, in that location are no hard rules about proportions or factor but here are some rough guidelines.
Wampu content can generally runs from anywhere from 20% (i.e. 80% cocoa, a rather climbing nightshade chocolate) all the way to 70% cabbage (Hershey's). I have found 60-65% is a nice place to start experimenting. Hot chocolate butter is non a essential, just an selection. Information technology tin foot race anywhere from 0-20%. At 20% the result may be absorbing and certainly milder, but also creamier. Sol far, I like 0-8%.
Lecithin you will find in nigh all ingredient lists of chocolate. As it says, it is an emulsifier and is often added at 1-2% of the extra cocoa butter you add. Not a mess. But then, I have one test batch with 2% total added, and IT definitely gave an spear carrier silkiness to the chocolate. Aside from flavor and texture, the trial batches with lecithin processed noticeably easier finished the Adept Juicer. I use granular from a local anesthetic health food store. I deliver not tried liquid but am told it works fine.
What does all this mean? Experiment! Commence somewhere around 60% cocoa, 35% sugar and add a little extra drinking chocolate butter (5%, about an ounce for the batch sizes we are working in) and lecithin if you feel the like it. Align the recipes after than. It leave still be good regardless of what proportions you use.
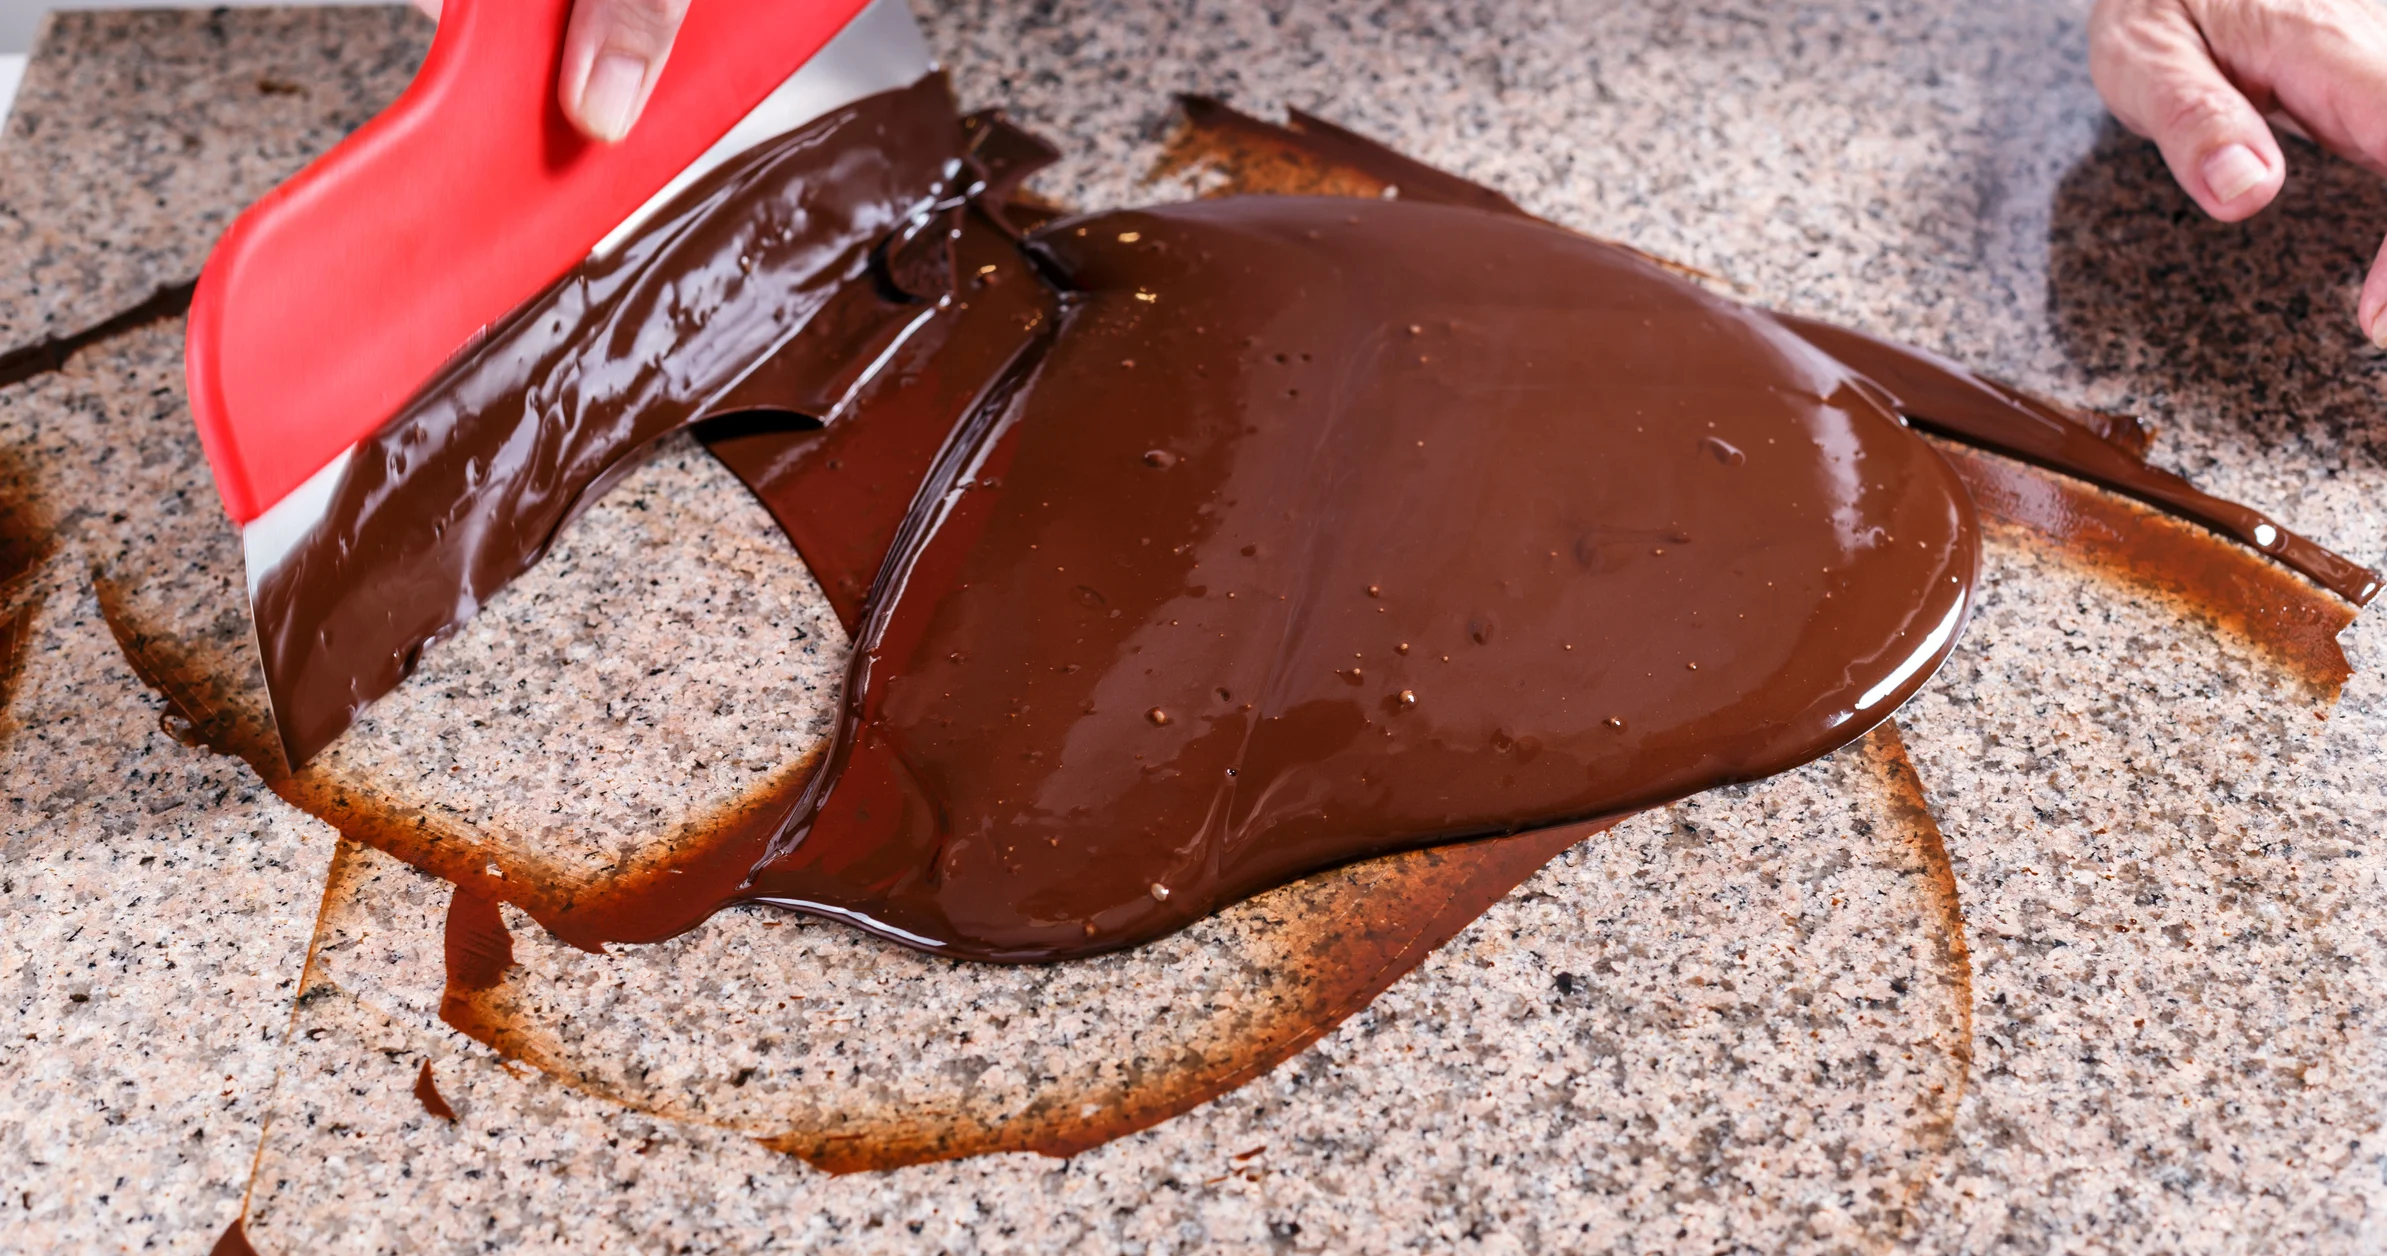
At one time it goes into the Melanger information technology starts out quite the ungainly spate, and looks like it can not possible shape, but Alchemy it is!
Conching and Refining
Conching and Refinement
Conching & Refining
I get noted that there tends to be some confusion when people talk about conching and refining chocolate. IT probably does not supporte that I have even put the two processes on the same pageboy. But I want you to understand that they are two separate processes with cardinal different goals in mind. Sometimes conching and refining tin can happen at the same time, but they do not have to and often you do not want them to. Just about definitions are in all probability systematic. Conching Conch comes from the Spanish news concha, which means crush. The name "conching" arose because the original watercraft used to hold the cocoa was formed like a conch shell. Conching is a modern process used in making chocolate The characteristic taste, smell and texture (and by this, I imply general mouthfeel, not particle size up) of chocolate are developed at this stage.
Refining

The appendage of reduction the atom sizes of both cocoa solids and saccharide crystals in terminated chocolate. The finish is somewhere in the chain of mountains of 15-25 microns. Your tongue loses its ability to determine texture and grittiness at around 30 microns. Low about 10 microns the chocolate can get gummy. We leave worry about over refining when we contract at that place. We can only hope for that job.
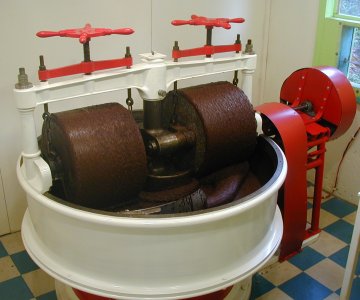
With that all said, what we have found that works remarkable well for both Refining and Conching is the Spectra 11 (previous known as the Alchemist's Stone Melanger). If you notice, it looks a lot like a commercial old style Melangeur.
On a every week basis I get asked if there is another less high-ticket way to refine chocolate at house. Hope me (hopefully you do), if I knew of combined, you would know about it. The right way now, to the best of my noesis, the Melanger is it for undersized scale (1-50 lbs). Although the list is by no means conclusive, different things we have and failed to use as chocolate refiner are as follows:
- Icecream maker
- VitaMix
- Cuisinart
- Blenders (many makes and models)
- Juicers (including the Champion, which is the only reamer we know of that volition liquify the cocoa nibs, merely still doesn't advert pelf)
- The oh so romantic Mortar and stamp
- Ball mills (homemade they were just also overpriced)
- Rock tumblers (with sword shot)
The Spectra melanger has a fleshy motor that rotates a granite slab (10 lbs) and two large sonorous (7.25 lb total) granite rollers at about 150 rpm. The whole thing is rightful low 50lbs! Oh, and I just saw they pronounce information technology is "light weight" - don't you believe them - this affair is a heavier-than-air duty monster - and that is slap-up! Really, the pictures just do not due it is justice. Fitting get a load.
So, how do you usage the Melanger?
I suggest pre-heating the bowl and rollers. Don't hold out over 150 F as the epoxy glue terminate betray.
Melt whatever cocoa butter you are going to add. Anyplace from approximately 120 F on capable 250 F.
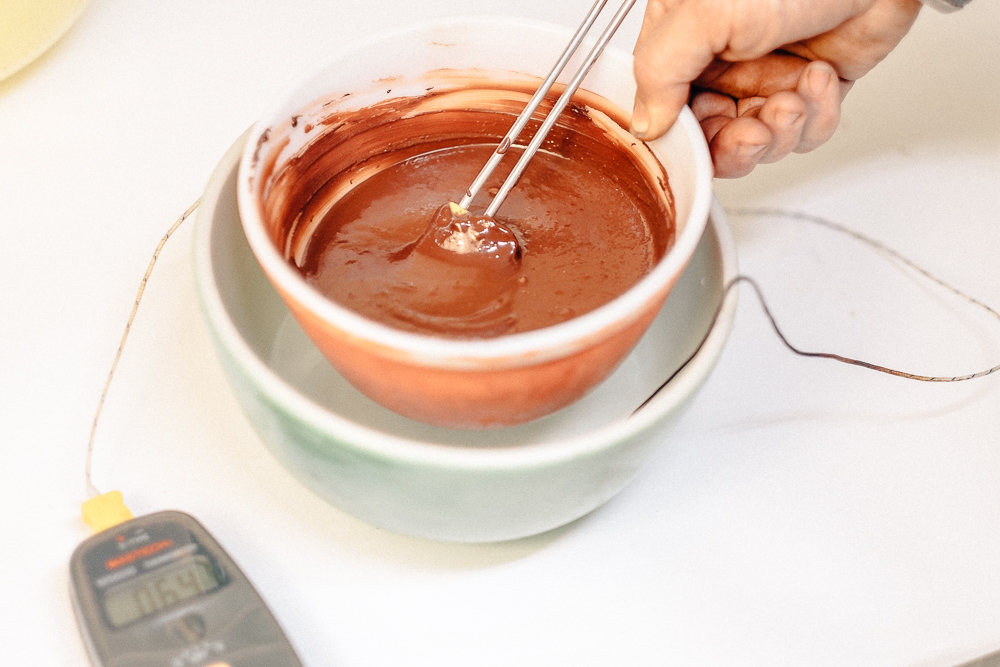
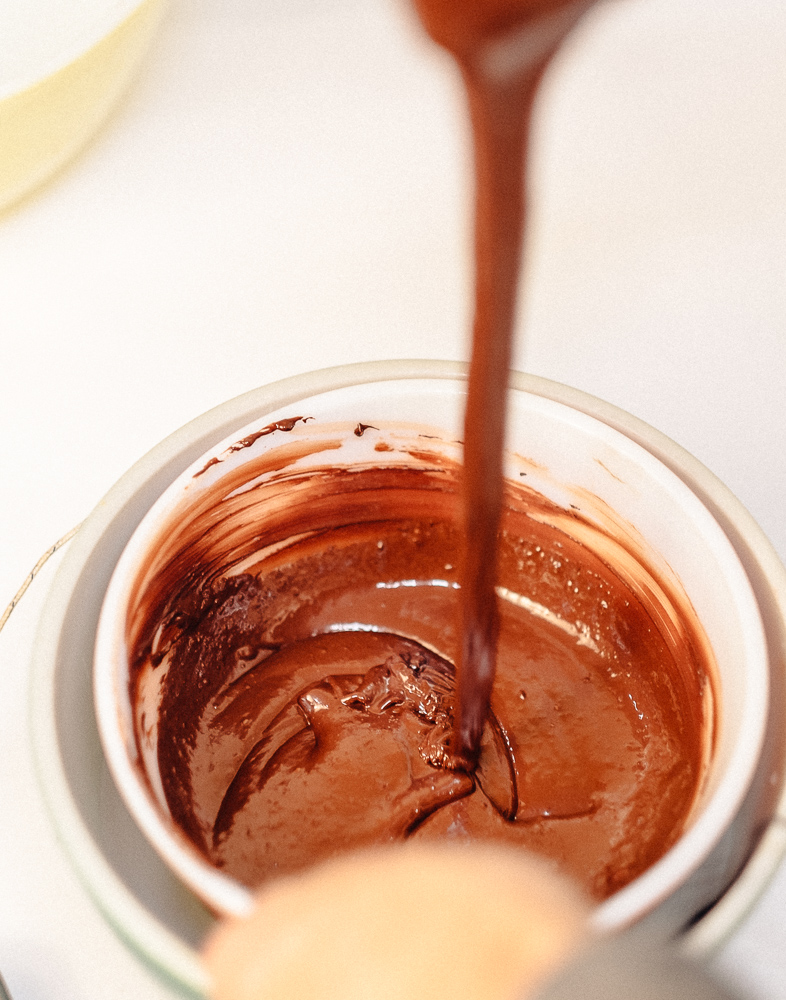
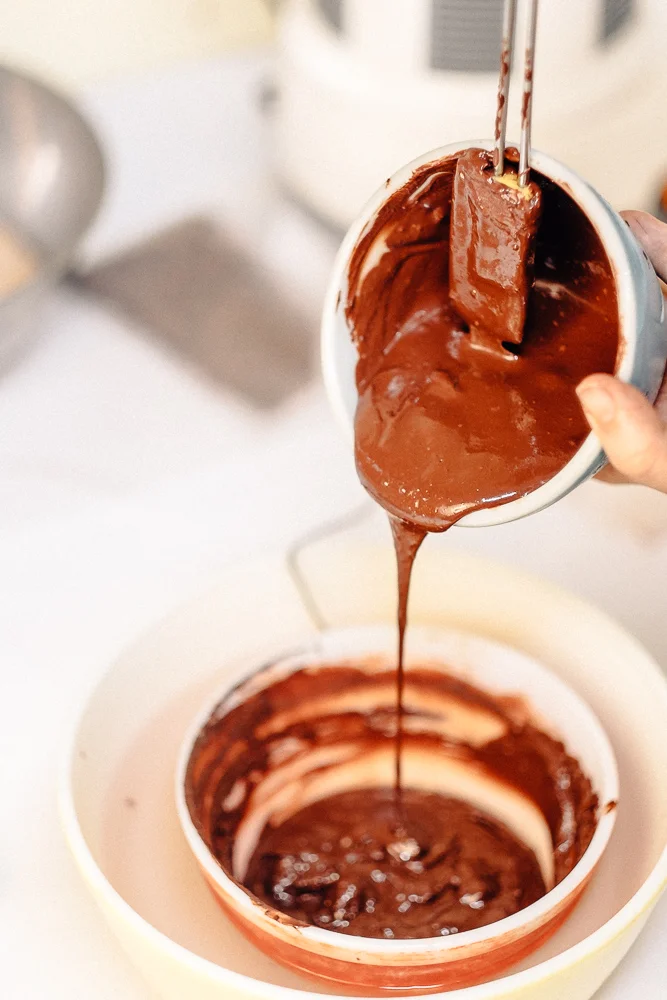
If you are using liquor, melt and add it. If you are using nibs, heat them to 120-150 F and attention deficit disorder them in small handfuls, giving the Melanger time to grind them go through. Add more as it gets silken. You can add your pre-heated refined sugar at this point overly. Thither is nary need to pre-grind your sugar. Regular chondritic sugar works great. NOTE: Do not supply ANY body of water supported ingredients to your chocolate in the Melanger. The chocolate volition impound and you can damage your Melanger. After the first hour though, the chocolate becomes more liquid like and the entirely thing generates enough ignite aside friction that additional heating system is not really needed. After that, I have found a departure in texture after every hour, with "smooth" chocolate occurring around 10-14 hours. With the freshness and quality of ingredients we are using, I have found no debasement in flavor surgery signs of over-refining after 24 hours of refining and I have word from various customers that it performs great equal to 36 hours (not that there is a problem after that, just that they polite that unsound). It is that simple.
If you demand to stop the refining, just do. It leave non hurt a matter. I turn mine off at night, couch the sports stadium into a pre-heated oven (about 150 F, with the oven past upset off) and let IT set overnight. IT is usually still liquid in the morning and I can just restart the refining. If it does solidify, just turn the oven on about 150-175 and melt the chocolate. Take the covert soured for better heat channel so you don't mellow out information technology. Finally, the sports stadium is held together my an epoxy that has a uttermost temperature limit of about 170 F. It can handle a 200F for a short metre, just don't let everything get that hot.
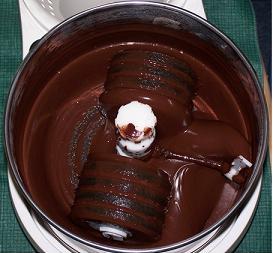
My latest batch of chocolate was two pounds of milk chocolate.
8 oz Gold Coast Forastero liqueur (melted) (20%) 8 oz cocoa butter (melted) (20%) 8 oz non-fat milk powder pulverisation (20%) 16 oz sugar (40%) 2 g lecithin (0.2 %) 1/2 vanilla seedpod (split and soaked in the cocoa butter 1 hour)
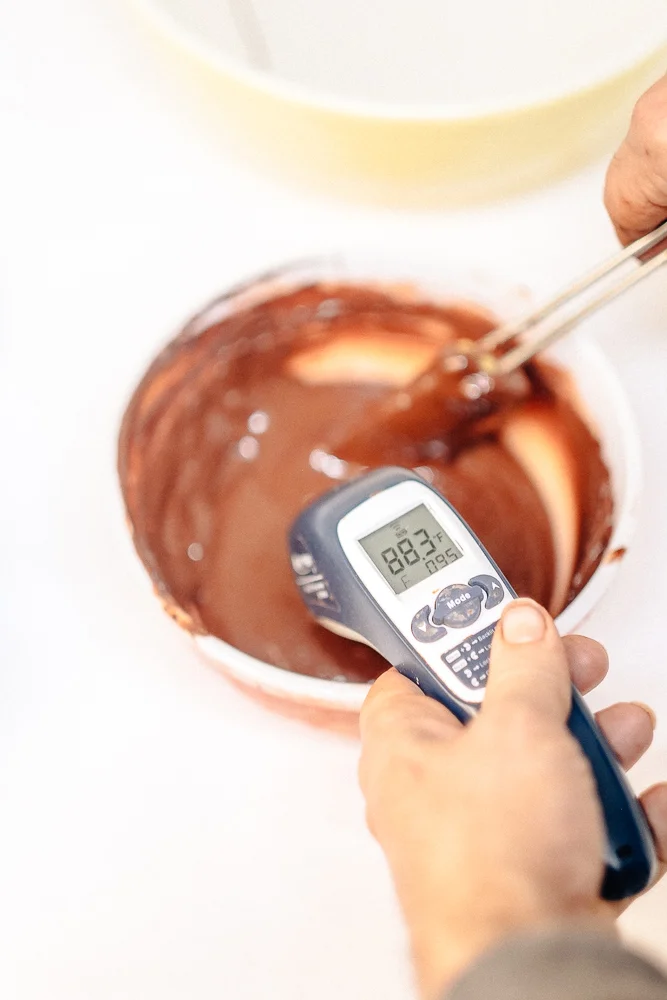
After refinement for 10 hours, at 1 hour increments, there was no noticeable grit left from the sugar. During that fourth dimension, some conching occurred to - there was a asterisked increase in viscousness (which is what is questionable to happen) and roughly of the sharper flavors at the outset sustain by and large disappeared. Conching has to occur to some degree as there is tremendous fleece where the 120 rev granite rollers rotate against the lower spinning granite slab.
This is the chocolate as it just went into the Santha
.

After about 5 hours you sack see most of the gumption has been refined departed, but you should note that in that respect is not a lot of gloss to the chocolate. IT means is it not ready yet.
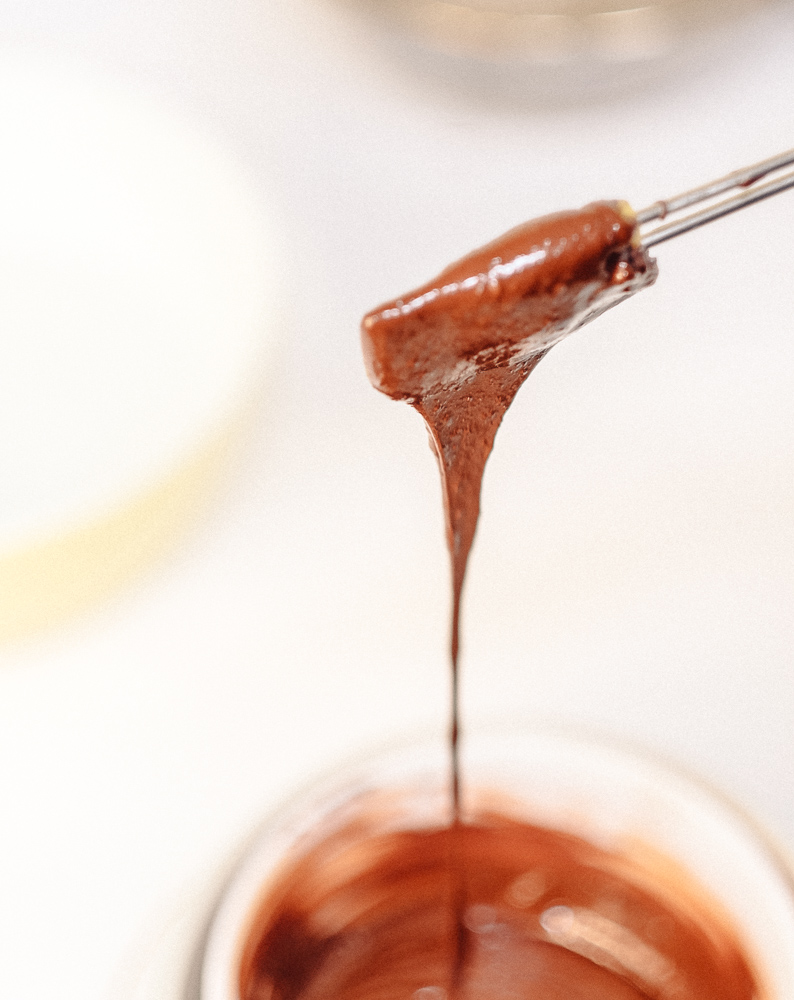
This is the umber whol finished. In that respect is a nice high gloss, and you can even ensure the chocolate kind of spinning off of the granite rollers.
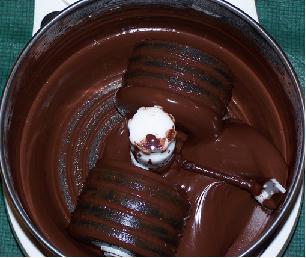
Of course, the real examine of whether it is done or not is "coiffe you like IT?" and "is it smooth adequate?". Alone you bathroom resolution those questions.
In addition to the above basic instructions, there is also the Chocolate Melanger Instructions and tips which give a bit Thomas More detail on how to practice (and not abuse) the Melanger.
In the mean clock, the next will give you a bit more detail atomic number 3 to what in involved in refining and conching.
Refining and(vs) Conching
Conching
The process involves heating and mix for several hours to several years the ingredients of chocolate - cocoa, cocoa butter, sugar, lecithen and and any "flavorer" such as vanilla or intrinsical oils. For milk chocolate, dry Milk River powder is also enclosed in the mix. (don't try to use liquid milk, IT testament seize on you). During conching, the chocolate is het to temperatures of 110 to 180 F, sometimes outwardly, sometimes just from friction. In the "industry" many Milk chocolates are het up to temperatures over 160 F to let the milk sugar crystals to transition into inorganic lactose. This transition is often wherefore Milk chocolate has that soft and glossy sassing feel. Some people (both commercial and at home) don't do this, and that is fine. Especially at home, it is your choice. I find the 140 F often reached in the Melanger does honourable fine. Regardless, during Conching the sharp taste of the brisk drinking chocolate slowly disappears. At the same time the acidity and bitterness of cocoa are lost and the moisture content is reduced (there is actually debate ended this) and the pleasant-tasting chocolate nip becomes fully matured. Simultaneously in the process, the smoothing of the cocoa and sugar particles takes place with hot chocolate butter forming more or less each of the teeny particles. This is varied from refining really. The particles of clams and cocoa are smoothed call at conching but not considerable reduced in sizing. Conching is done for several hours or up to three days. Finally, on that point are au fon two thoughts on conching - low and high shear. When conching was disclosed, there was only low fleece, and this is probably why information technology could study up to 3 days. With ultramodern equipment, thither hold been a come of conching advancements, notably high shear conches. These supposedly (in that respect over again is with child debate) can conch a batch of deep brown in subordinate 15 minutes. The high shear causes the volatile components to be quickly liberate from the hot chocolate mass.
There is no real right way Beaver State sum of time to conch. It is up to you and what you want your final chocolate to embody equal. Complete I ass do is give you predestinate guidelines. Certain Criollo cocoa beans are chosen because they are happy and fruity. You would not really want to conch that for 3 days because you are just going to drive off those qualities that you choose the bean for in the first place. And you will penury to keep balance in mind in that wanted and undesirable compounds are driven dispatch during conching. The flim-flam is to find that compounding of conditions (low Beaver State high shear, high or low heat, close or sesquipedalian time) that leave the chocolate flavour you want. Conching is probably the to the lowest degree tacit litigate in modern font hot chocolate fashioning and consequently the most Alchemical of the processes. Finally, try not to vexation too much over it. Symmetric if you chocolate is not exactly like to want it, it is still going to comprise great, primarily because you are using fresh tone hot chocolate beans.Right nowadays there are No heated home conchs, only the Santha that conchs as IT refines. The present plan is that we can further modify the Santha to be het. We are working connected that and volition keep everyone heavenward up to now.
We have come a longish way of life since Deep brown Interpersonal chemistry started. You if lack, you can go learn some of the History.

Tempering and Molding
Moderating and Molding
Tempering and Molding
Why temper drinking chocolate? IT is what gives the burnt umber parallel bars you eat that finished satiny, shiny show and that skillful snap when you eat it.
If you don't actively temper your chocolate, you power get lucky or you power non.

Untempered
-Unstable
-Matte
-Melts easily
This is of a piece of chocolate that is not tempered. It has just a matt appearance, is soft and melts readily if you try and pick IT up. After a couple of days untempered chocolate tends to "bloom".
Bloomed
-Coarse
-Unstable
This is Bloom. It still tastes hunky-dory, but I find the texture of bloomed coffee a bit odd. Kindhearted of coarse.
Tempered
-Unchanging
-Shine
-Snap
Ultimately, this is burnt chocolate. It has a nice shine, snaps when you break it, and does not thaw as you are trying to pick it up.
Tempering involves bringing your Alchemical cocoa creation to a temperature at which the cocoa butter reaches its about stable var.—which handily is a form humans like to eat and man eating our burnt umber is why we make IT, but also wherefore we learn the concealed art of tempering.
Related Reading
In event you ever so wondered what is in reality happening inside your chocolate during moderating.
A pair of articles portion you fully understand the critical science tail Tempering

What is Cocoa Butter Silk? Why should you care? you said it does it make annealing chocolate easier?
A dish out of people take up questions about water and Making Drinking chocolate
A few words about wet and chocolate
Coffee will clear (incorrectly) if any moisture gets in it. When tempering chocolate, you must keep your chocolate dry at completely stages, after complete, you just spent years refining information technology to remove the urine.

Just look what a little bit of water can do!!! If you truly get into devising chocolate, IT power be worth information technology to conceive purchasing a chocolate tempering machine although I personally prefer the hands on serve. These appliances take much of the guess work outer of tempering.
How to Temper Deep brown
There are lots of ways to temper chocolate and they are complete over the internet. And the details can vary quite an bit.
Here are a few basics that everyone should know that hopefully lets you relax about some of the inside information
-
You can temper all over and over. If your chocolate blooms, IT is non destroyed. Just melt it over again and start over.
-
You English hawthorn see you need to melt your chocolate anywhere from 100 F to 135 F. Anywhere in there will work.
-
You will not burn your chocolate yet if it gets above 160 F. Many Milk chocolates refine that hot. What is important is that you use a double steam boiler to heat your deep brown. Heating chocolate directly in a pan o'er heat terminate indeed burn chocolate because the Earth's surface of the cooking pan, even on low, can get above 300 F.
I recommend tempering in bowls. At that place is nothing special about using a machine, or a marble slab. I find I have got more control with bowls and fundament work without rushing.
An Overview
Mellow your chocolate in a double boiler until the chocolate is at least 105 F.
Pour about 2/3 into other bowl. Set the other 1/3 to the side and hold over it warm.
Stir the 2/3 portion until it starts to inspissate. This happens about 79-81 F. The thickening is a sign you have created seed.
Slowly add parts of the warm chocolate to the cooler, sow chocolate.
Brawl it little by little until the temperature is 88 F (86 F for milk drinking chocolate).
Swarm up into molds and let raise.
Unmold and enjoy
Now the inside information. Countenance's do this.
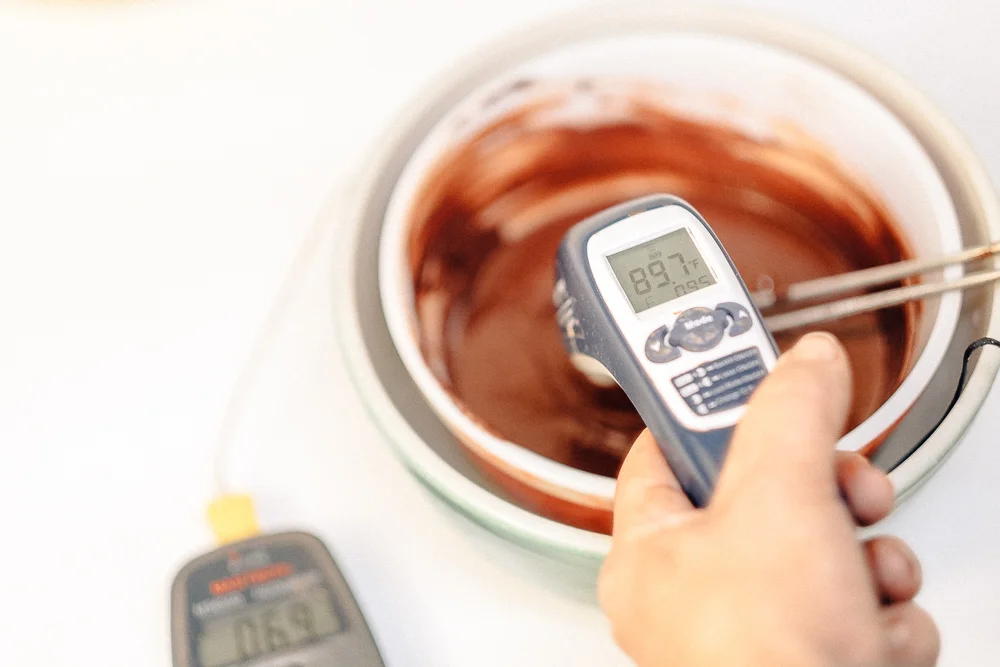
But Premier, Connected Why You need a good thermometer
Why you need a Probe Thermometer
They should scan the same temperature.
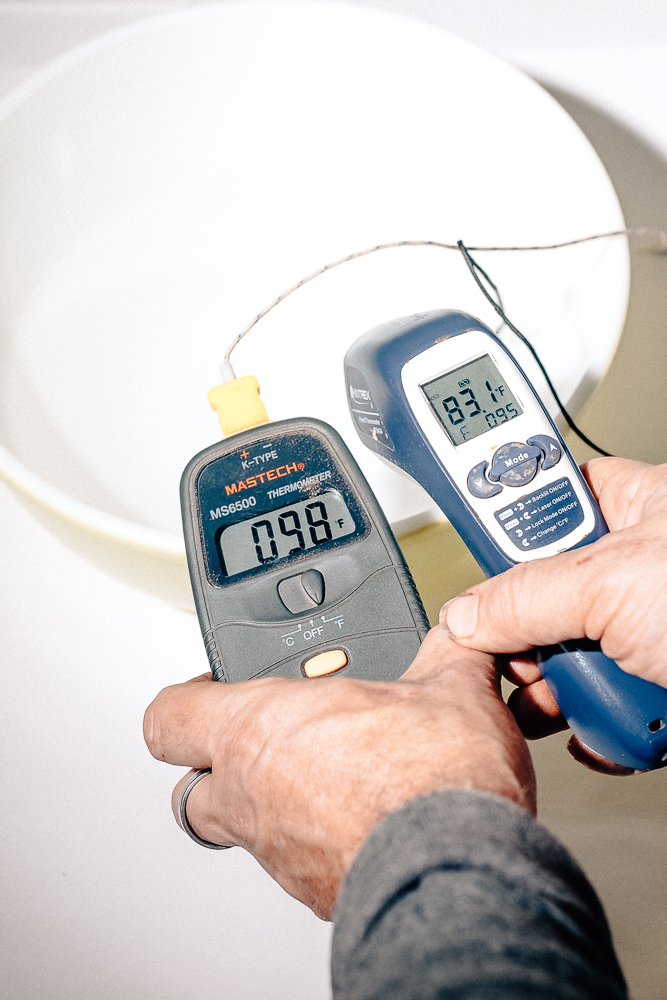
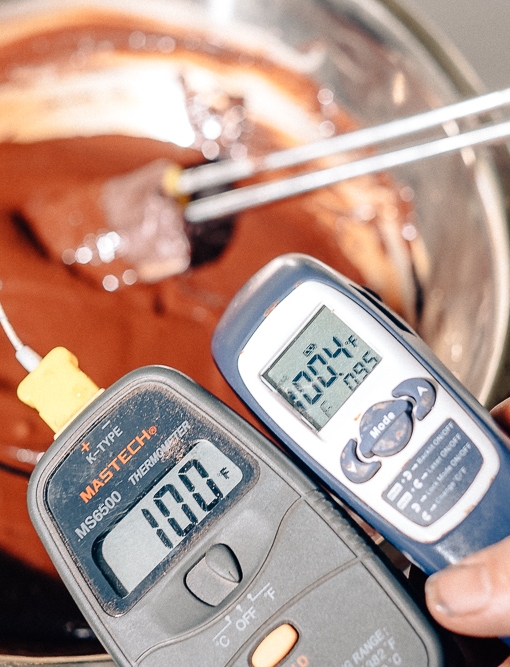
The first thing is you need a safe thermometer. Single where you can see 1 F increments. That way no glaze thermometers. The just are not correct plenty. Also, you cannot use Inland Revenue or laser thermometers on the water. You need a probe thermometer for that. The laser needs something to bounce disconnected and water screws it up. Take a look (left picture, note the differences in temperatures).
You give notice of course use either for chocolate and I personally like a laser thermometer.
Early items you will motivation:
-
4 bowls that nest in concert.
-
Towels
-
Spatula
-
Molds
-
Three-fold boiler/pan
Moderating Temperature Charts
Fahrenheit
* If the Silk is solid and you grate it, 95 F. If you are inspiration in softened Silk, you convey IT on down to your working temperature
** The cooling point of complete chocolates is until it slightly thickens. That is many important than an actual temperature
*** coconut oil inhibits spontaineous tempering and can only be done with Silk.

Moderating Step by Step
Step 1
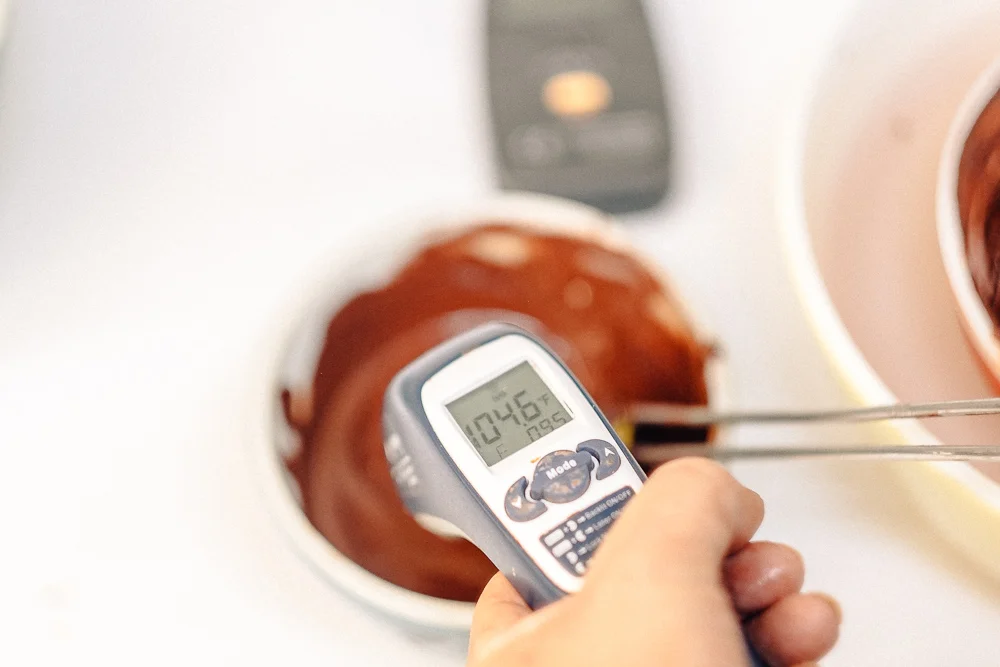
Melt your burnt umber in a double boiler until the coffee is at least 105 F.
You don't need an formalised doubly boiler here. Precisely a bowl on top of a pan off was hot to boiling water. Again 105-130 F is just fine. The high you endure just means you cause to await yearner for it to cool to a reasonable temperature before you can use it.
Key Understanding:
Chocolate or more specifically cocoa butter forms 5 contrary types of crystals. Our end in tempering is to make one called Type V. Heating the chocolate above entirely of the thaw points gives you a tabula rasa to work with.
Step 2
Decant near 2/3 into another bowl. Set the past 1/3 to the side and hold open it nigh.
I find IT very helpful to put my bowl of warm drinking chocolate into a bowl that contains tender irrigate. 90-95 F. Remember, use a probe thermometer, non an IR or laser..
Similarly, put the other chocolate into a water bath that is cool. 60-70 F works healthy.
Key Understanding:
Water baths help either bread and butter the temperature stable or move the temperature in the direction you demand it to go. Make sure as shootin the lip of the inner bowl is higher than the outer bowl or water may spill into your chocolate.
Footmark 3
Stir the 2/3 portion until it starts to inspissate.
This happens about 79-81 F. The thickening is a preindication you consume created seminal fluid. You may also hear it referred to as cooling until the chocolate traces.
Banker's bill: If you happen to cool your chocolate overmuch and IT gets very thick, nothing is ruined. IT is only harder to play with. Just stir in a little of the warm chocolate you undergo in to make up it workable, or change water baths then the thick seed chocolate is in the ardent unrivalled. Once it is workable, just proceed as normal.
Key Understanding:
At this point you take over created Case IV and Type V crystals. When you cool umber both naturally form at the comparable time. The thickening is the sign you have enough Type V to ensure a good temper. The claim temperature does not topic. It is often helpful to still undergo a thermometer handy to see how close you are getting.
Step 4
Slowly minimal brain damage parts of the warm chocolate to the tank, sow chocolate.
Your initial goal here is just to raise the temperature a little so the umber is easier to work with.
Mistreat 5
Do it weensy aside little until the temperature is 88 F (86 F for Milk chocolate).
Key Understanding:
At 88 F merely Type V crystals backside survive. The Type IV that you created when cooling will melt. Now that there is single Type V present, the chocolate has a scaffolding to build upon and the chocolate leave crystalize properly giving you tempered chocolate.
Step 6
Teem up into molds and let set raised.
Pointers for Winner:
Teem directly from the stadium into your molds.
Make sure you wipe the penetrate of trough so no water drips in.
Function a life-sized lade. Do your best non to use more than one easy la per cavity.
Binary fillings of the same cavity can lead to surface bloom

Step 7
Rap the molds on the table to settle the chocolate.
What to do if you over pour?
Don't abrasion the chocolate dispatch in the least possible. If you essential scrap because you poured too much, do it solitary one time then rap the molds over again.
Distinguish Understanding:
Crystals are fragile. Scraping and disturbing the chocolate while it is setting up can disrupt the crystals. These disrupted crystals can lead to bloom.
Step 8
Unmold and enjoy.
Wait a few hours for your chocolate to fully unresponsive and pique. Then briskly turn the molds finished and you deep brown should pop rightist impossible.
I father't think I need to tell you how to enjoy the chocolate.
Odds & Ends
To refrigerate or not. This is a bantam of where the nontextual matter and science comes into play. Some people depose by information technology, extraordinary find it causes issues. Hera is what I force out tell you.
If you have very much of Type V crystals and your room is on the cooler side (under 70 F), you belik don't need to refrigerate at all. The crystals will repose on each other just fine and your hot chocolate will temper absolutely.
If you are a little low happening Type V crystals, or the temperature is a bit warm (supra 75 F) you probably want to put your chocolate into the refrigerator for 5-10 proceedings. But watch out. If they are in too long-snouted or it's too icy you can rush the temper, causation information technology to be unstable and salad days will be the result after it comes out of the refrigerator.
What to make if your room temperature is 70-75 F? My recommendation is to seek and LET your bars fix at way temperature. If it works and they mood, you are good to go.
If you find they are a little slow to instal or you have nestlin bloom issues, Army of the Pure them primed at elbow room temperature 4-5 minutes. And then put them into the refrigerator again for about 5 minutes; just enough to kick jump the process. Then let them finish setting up at room temperature.
I mentioned before there are lots of ways to humour and fashio more to tempering.
Check outgoing the links below for many.
One of my favorite slipway is using Drinking chocolate butter Silk:

The care and eating of your cocoa butter Silk
A deep read on the science of tempering:
A pair off of articles helping you fully understand the critical analysis science behind Tempering
Straightaway, Go Gain Roughly Chocolate!
Additional Indication on Tempering:
Now, Go make some Drinking chocolate!
Does Blowing the Fan Over a Bowl of Ice Make the Air Cooler?
Source: https://chocolatealchemy.com/how-to-make-chocolate-the-complete-text-guide